

FlyboyAF
-
Posts
29 -
Joined
-
Last visited
Content Type
Profiles
Forums
Articles
FAQ
Tests
Classifieds
Store
Group Buys
Everything posted by FlyboyAF
-

Building a Quality Golf Simulator
FlyboyAF replied to FlyboyAF's topic in Club Making/Repair & DIY Projects
@Tuckerman Thank you!!! It was a passion project for sure The viewable screen width is 160" (13.33') with 5.5" frame segments covering the remainder of the screen on both sides. The screw hooks that catch the bungees are screwed into the lateral ends of the frames internally. I bought a 115" x 167" Premium Impact Screen from Carl's Place (Custom) with finished edges (grommets) and a sewn pocket on the bottom. I put an aluminum pipe through the bottom to keep tension from the bungees on the top and keep the screen smooth. So about 3-3.5" overlap on either side (Frame to Screen). Leave plenty of room to ensure you can tune the tension so the ball return is just right back to just in front of the hitting area (adjustable bungees also work very well for this). No concerns at all with conduit instead of eye hooks as long as you remember to put some spacers at a few points between for standoff so you can wrap the bungees. Looks like I'll be installing a couple high speed cameras and the Swing Catalyst Dual Pressure Plates this summer -
Building a Quality Golf Simulator
FlyboyAF replied to FlyboyAF's topic in Club Making/Repair & DIY Projects
Pretty easy. You just press the "L" button on the Quad and move it to the other side. If you are connecting to the computer via Bluetooth with a charged battery, there aren't any cord attachments to anything -
Building a Quality Golf Simulator
FlyboyAF replied to FlyboyAF's topic in Club Making/Repair & DIY Projects
Yes. The hooks screw into the inside of the wooden frame. There is extra coverage from the frame to hide the connection points to the screen. -
Building a Quality Golf Simulator
FlyboyAF replied to FlyboyAF's topic in Club Making/Repair & DIY Projects
Zero problems....it's like new. I've only hit the ceiling protection a couple times with some lob shots, but the memory foam does it's job in dampening the impact velocity instead of creating a trampoline effect like other foam solutions. If I'm practicing/hitting wedge shots, I'll move up to the front of the hitting mat (about 6' to the screen) to ensure the ball impacts the screen. -
Building a Quality Golf Simulator
FlyboyAF replied to FlyboyAF's topic in Club Making/Repair & DIY Projects
Yes. I use GCQuad as the launch monitor and FSX Pro for the simulation. I've been looking at GSPro as what I want to move to for playing courses. It has a ton including "Georgia Golf Club" The closest I will come to playing Augusta! lol. -
What Player Will Have the Most Points - J. Rahm What Player Will secure the Clinching Point on Sunday - V. Hovland
-
Building a Quality Golf Simulator
FlyboyAF replied to FlyboyAF's topic in Club Making/Repair & DIY Projects
I left 14" between the wall and the screen. Keep in mind with your setup: You have to be able to get behind there to setup the grommets on the hooks on the left/right/and top of the impact screen....so the more room, the easier that will be I haven't had any issues with the impact on wood because I don't shank it lol. I can pull the side drapes out and move them in front of the wood on the sides. I have 6' between the front of my hitting mat and the screen, so if I'm hitting 60 deg wedges, I'll just hit from the front ; ) -
Building a Quality Golf Simulator
FlyboyAF replied to FlyboyAF's topic in Club Making/Repair & DIY Projects
If you have a concrete floor, there is the leveling factor, plus laying down some thin rubber layering and/or foam to prevent the plastic subfloor from sliding around. I used the TourLink Panels for my setup, but you could also look into using the Home Depot rubber tiles for a cheaper solution ; ) -
Building a Quality Golf Simulator
FlyboyAF replied to FlyboyAF's topic in Club Making/Repair & DIY Projects
Thanks Kanoito!!!! Putting in the work and building the majority of it myself was incredibly rewarding! The FX software comes with the GC Quad. They have different levels of the virtual courses that you can buy. At the top tier ($500 per course), they literally map every undulation, rock, tree, view, etc. Those are spots like Spyglass & Pebble Beach. They also have a bunch in the $150 per course range that are still pretty sweet from a graphics perspective....places like the British Rotum (Carnoustie, Gleneagles, etc). The Quad can link to other software as addins like Swing Catalyst, High-Speed Cameras (up to 2), etc, but the simulation software is FX. -
Building a Quality Golf Simulator
FlyboyAF replied to FlyboyAF's topic in Club Making/Repair & DIY Projects
Thank you very much!!! Eventually I would like to put a full bar / poker room in the adjacent room so I could have a bigger group over and we could just go between the two lol. With the craziness of what is hapenning at the moment, that is on hold. I also want to install a Swing Catalyst system. It uses a visual heat map to track and display your pressure on the ground throughout your entire swing and syncs it up to high-speed video. That way I'll be able to improve my pressure transfer and really put all of the force possible into the ball! : ) -
Building a Quality Golf Simulator
FlyboyAF replied to FlyboyAF's topic in Club Making/Repair & DIY Projects
You are welcome my man!! The reason I put it out there was that it took so much longer to go through the process myself due to the lack of consolidated information out there. Glad I could help stimulate some ideas! The hitting mat is one of the most important parts and the option I chose should be well within your budget (Real Feel Golf Mats). They will save your wrists and arm joints as well as have the added benefit of giving you feedback on your strike. If you hit a fat shot on these mats, you will hit a fat shot on your simulator....none of that bouncing up into the ball and making you think that you hit a great shot lol. I knew that I was going to spend on the launch monitor side, so did a little research on things like Skytrak, Optishot, and even Flightscope. I would go out and see if you could find a GC2 with HMT. You can get a refurbished set for about half of what the GC Quad would cost you. the HMT part gives you the ability to see where you are striking the ball on the club face while the GC2 part is the launch data. Still highly accurate and provides the most useful info to help you get better! -
Building a Quality Golf Simulator
FlyboyAF replied to FlyboyAF's topic in Club Making/Repair & DIY Projects
Thank you!! It's been a lot of fun to use with friends and for my daily practice. I started planning with the drawings and mapping out the space in April. I broke up the purchasing & building into stages just about as I laid out the Posts above...I did most of the work myself, so it took about 7 months to complete (research, budget, build time). -
Building a Quality Golf Simulator
FlyboyAF replied to FlyboyAF's topic in Club Making/Repair & DIY Projects
When are you coming to Houston?! -
Building a Quality Golf Simulator
FlyboyAF replied to FlyboyAF's topic in Club Making/Repair & DIY Projects
There have to be some wives out there that understand right?! If not, there is a chance that I'll be Batchin' it for the rest of my days haha -
Building a Quality Golf Simulator
FlyboyAF replied to FlyboyAF's topic in Club Making/Repair & DIY Projects
Pozzit - Finished it a couple of weeks ago lol. This is just the details of what I did, researched, and installed lol. I've been practicing on it and playing rounds on it every day since! -
Building a Quality Golf Simulator
FlyboyAF replied to FlyboyAF's topic in Club Making/Repair & DIY Projects
That requirement on the equal jewelry spend would have clipped this project short for sure!! Luckily, I'm a single guy at the moment....so the simulator was here before she was and she'll know what she's in for from Day 1! haha -
Building a Quality Golf Simulator
FlyboyAF replied to FlyboyAF's topic in Club Making/Repair & DIY Projects
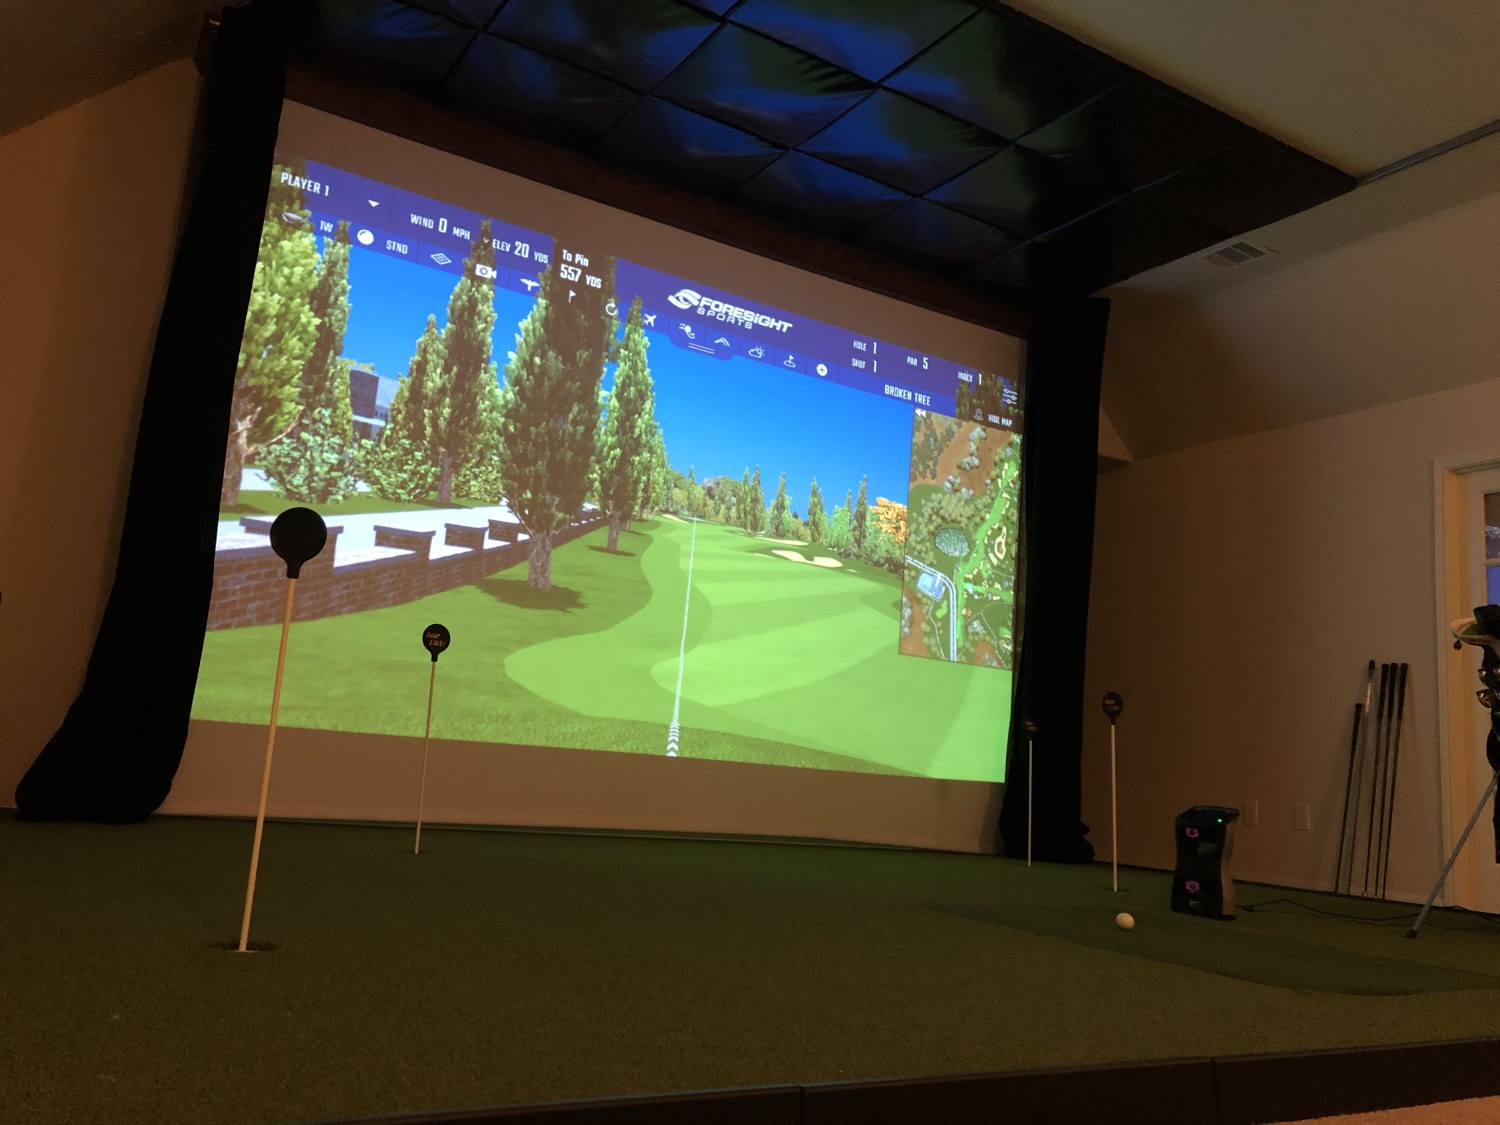
Results This has been an awesome project to research, design, and build. Some additional pieces that went into the finished product with links and costs are below: Computer Monitor - 42" Elo 4202L IDS Touchscreen (VGA, HDMI, Infrared USB Touch, Clear, Grey (shipping of $115 included) Link - 42" ELO Touch Screen Monitor $1,813 Computer - MSI Trident X (Intel Core i7 (9700K), Processor Speed of 3.6 GHz, 16 GB RAM, Nvidia GeForce RTX 2070 Video Card, Windows 10) Link - MSI Trident X $2,210 Kiosk Stand Link - Kiosk Stand for Monitor $445 Total Project Cost: $41,000 Joy from Project: Priceless ✔ I hope you all gained some knowledge and I hope I have been able to provide some of the better resources that I have found out there for this type of project! Feel free to ping me with any questions!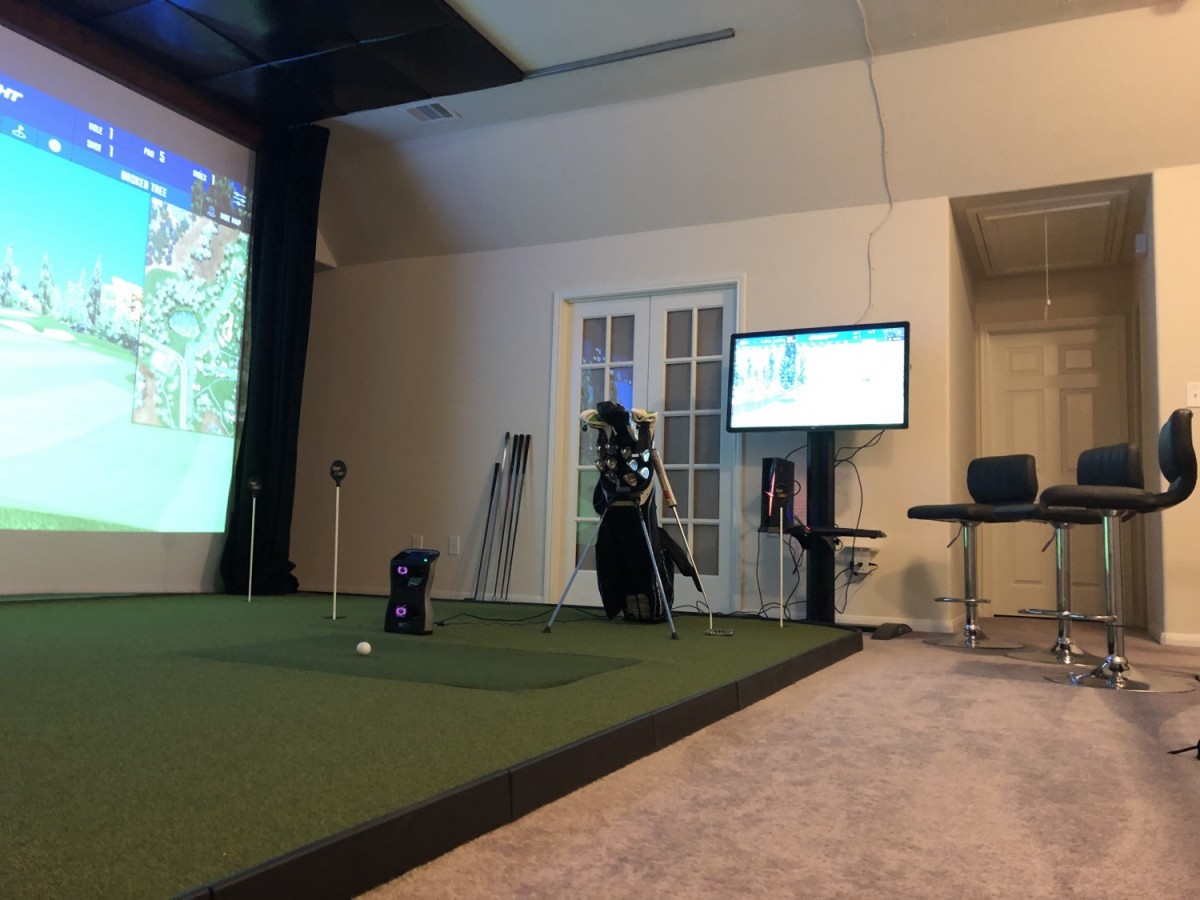

- 60 replies
-
- 14
-

-
Building a Quality Golf Simulator
FlyboyAF replied to FlyboyAF's topic in Club Making/Repair & DIY Projects
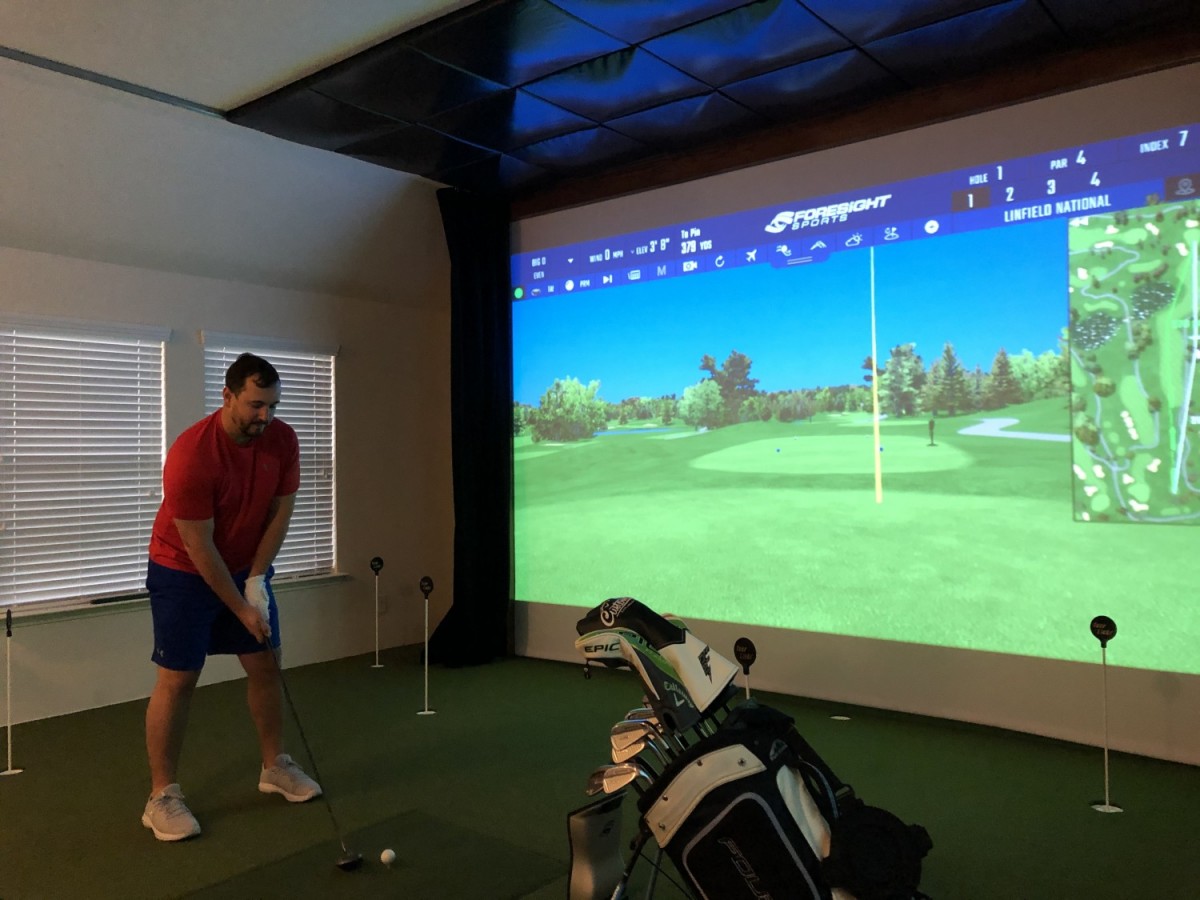
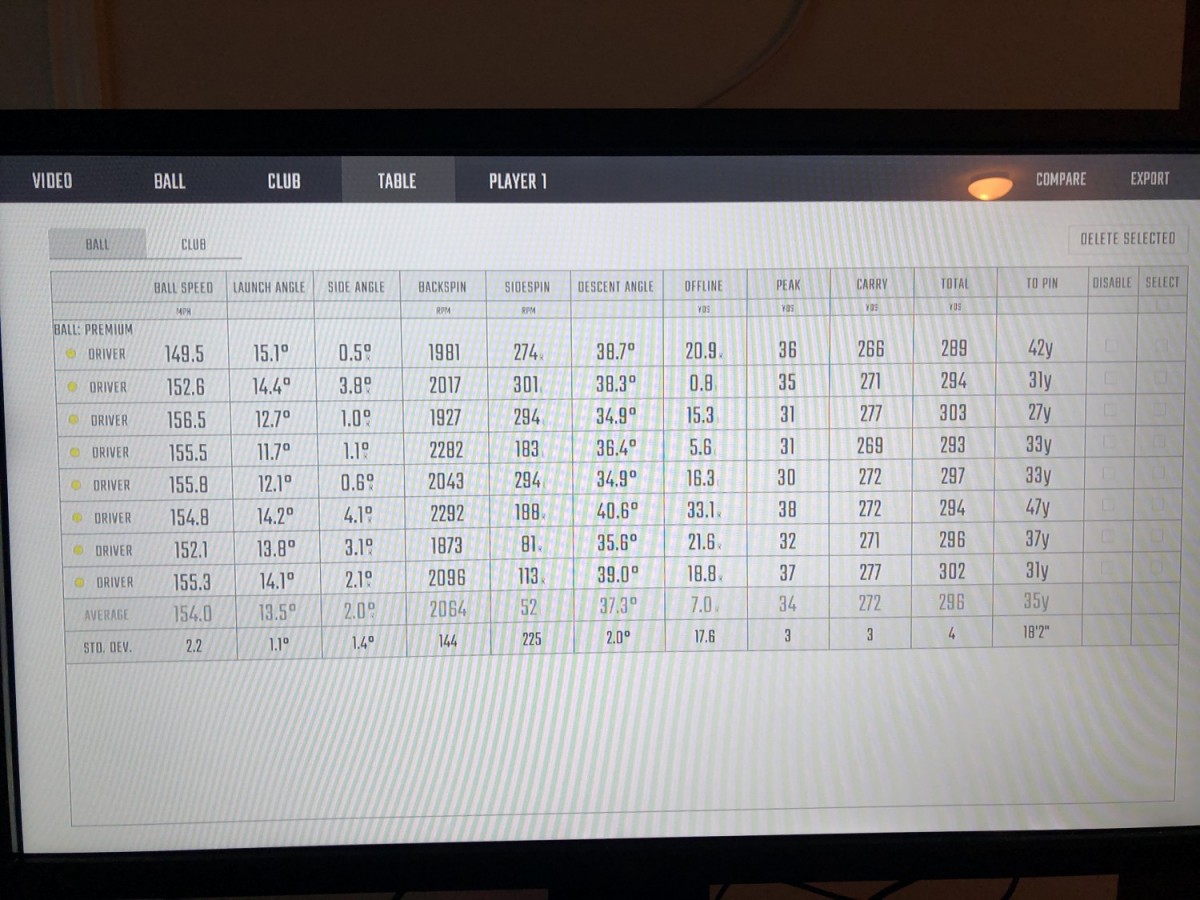
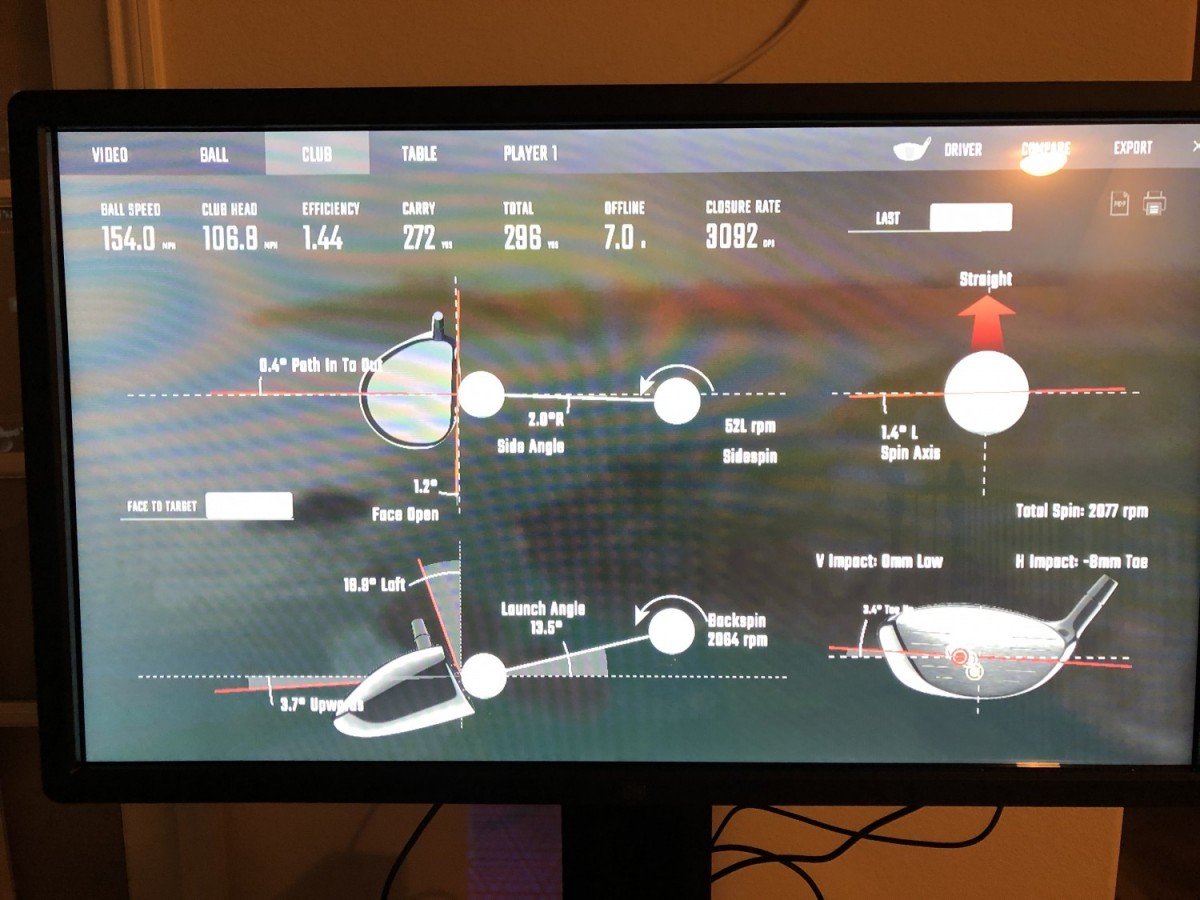
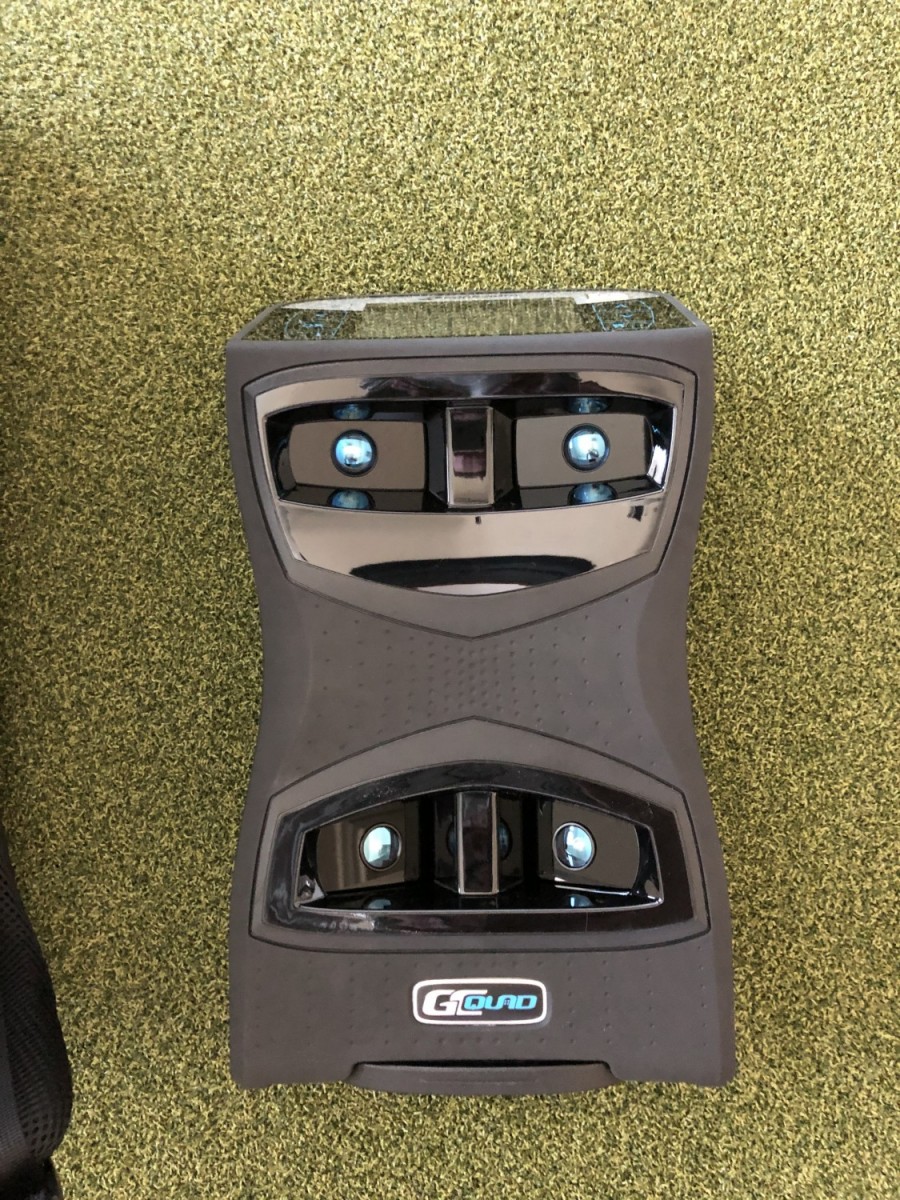
Stage 7: Launch Monitor Selection The all important decision.... There are manufacturers out there that sell all-inclusive simulator solutions like Opti Shot, SkyTrak, Full Swing Golf (used by Tiger & Spieth), Tru Golf, etc. These systems can run you anywhere from $500 to above $50K and have their own tracking systems that use Infrared Sensors & Cameras. When building a simulator piece by piece and selecting components individually, you have more control over that budget. I use my simulator for entertainment by having people over to play courses they won't get to in real life, but also practice every day trying to improve my game. Ball Data & Club Data accuracy are paramount to me because of this. I don't have 24'+ of room behind me in my simulator space, so Trackman was out of the question. The best launch monitor currently out there on the market anyway (IMO) is the Foresight GC Quad. It has 4 cameras that take 20,000 pictures per second to not only give you ball data that is +/- 1% of Trackman 4 numbers, but also shows you where you hit the ball on the club face! Gear effect will determine ball curvature and is something that Trackman cannot determine. Thus, if you hit the ball out on the toe of an iron with a neutral swing path (creating a draw curvature), Trackman will tell you that you hit a straight shot or fade while GC Quad will show you the true shot shape of a draw. Knowing where you strike the ball on the club face is also invaluable in helping you improve your ball striking. The compact unit is portable (indoor use or bring it out on the course or to the range with you), doesn't require any special room considerations, and gives you the most accurate & complete data available. $16,085 Here is a link to a video where they test the Trackman 4 vs the GC Quad in a head to head comparison at the same time off of 1 test subject hitting balls with PW, 7i, and Driver - Trackman 4 vs GC Quad Head-to-Head Comparison
-
Building a Quality Golf Simulator
FlyboyAF replied to FlyboyAF's topic in Club Making/Repair & DIY Projects
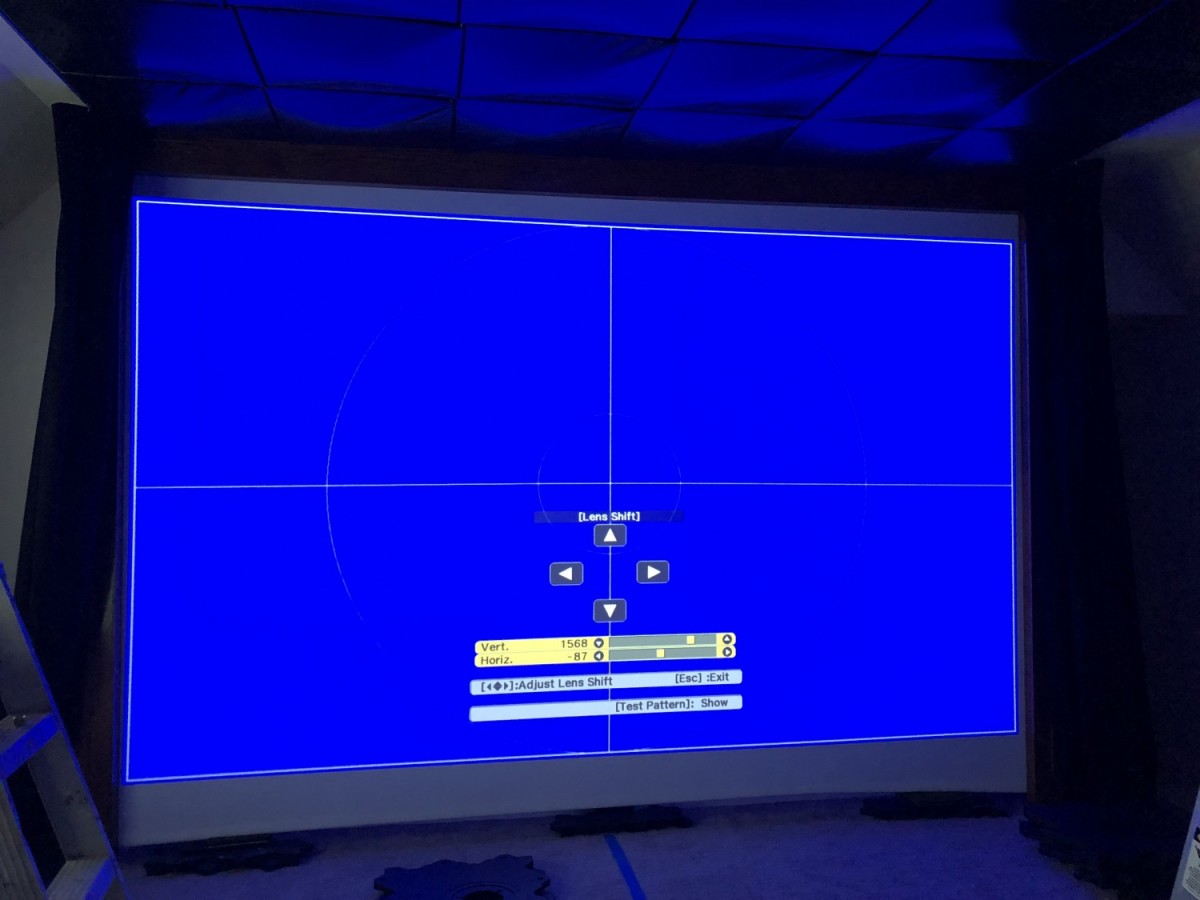
Stage 6: Projector Projectors: I investigated a lot of options including BenQ, Optoma, Sony, and Epson. The important factors in selecting the right projector for your application are Throw Ratio - The mounting distance away from the screen (D) divided by the width of the projected image (W)..... D/W Most simulators will require a short throw or ultra-short throw ratio because of available room length (0.3:1 to 1:1) You can buy projectors without lenses. The lens is the piece that is responsible for the throw capability (short-throw lens) You can also cheat throw distance by buying a projector with a good amount of zoom ability Link - Projector Central Throw Calculator (also a great site and resource for projector information) Lumens - Brightness of the projected image Less lumens are required for darker rooms and more lumens are needed for rooms with more natural light so that the projected image isn't washed out by the ambient conditions Minimum Lumens: 2000 in a dark room Recommended Lumens: 3000+ Optimum Performance: 5000+ Aspect Ratio - Relationship of width:height of the projected image Typical ARs are 4:3 (Rectangular), 16:9 (HD), and 16:10 (Awesomest) Resolution - Number of pixels contained in the image (pixels for width x pixels for height). The "W" below stands for "Wide" used with 16:9 & 16:10 ARs SVGA to UXGA: Resolutions for a 4:3 AR 800 x 600 to 1600 x 1200 WXGA to WUXGA: Resolutions for 16:9 & 16:10 AR 1280 x 800 to 1920 x 1200 The more pixels you have, the clearer and crisper your image shall be There are also 4K specs, but now you're getting into ridiculous amounts of $$$$ In the end I went with the Epson Pro G7500 projector w/Epson Short-Throw Lens (ELPLU03). $5,424 Link - Best Deals I Found on Projector & Lens - Tierney Brothers 6500 Lumens 16:10 Native Aspect Ratio 1920 x 1200 Resolution (WUXGA) 50,000:1 Contrast Ratio 1.0 - 1.2x Zoom Ratio 0.65 - 0.78 Throw Ratio in 16:10 AR Throw Distance of 9' 11" back from screen Mounts are also a whole world unto themselves..... I went with the Epson ELPMB 47 Low Profile Mount to maintain as much vertical clearance as possible between a golfer swinging a club and the expensive projector lol $322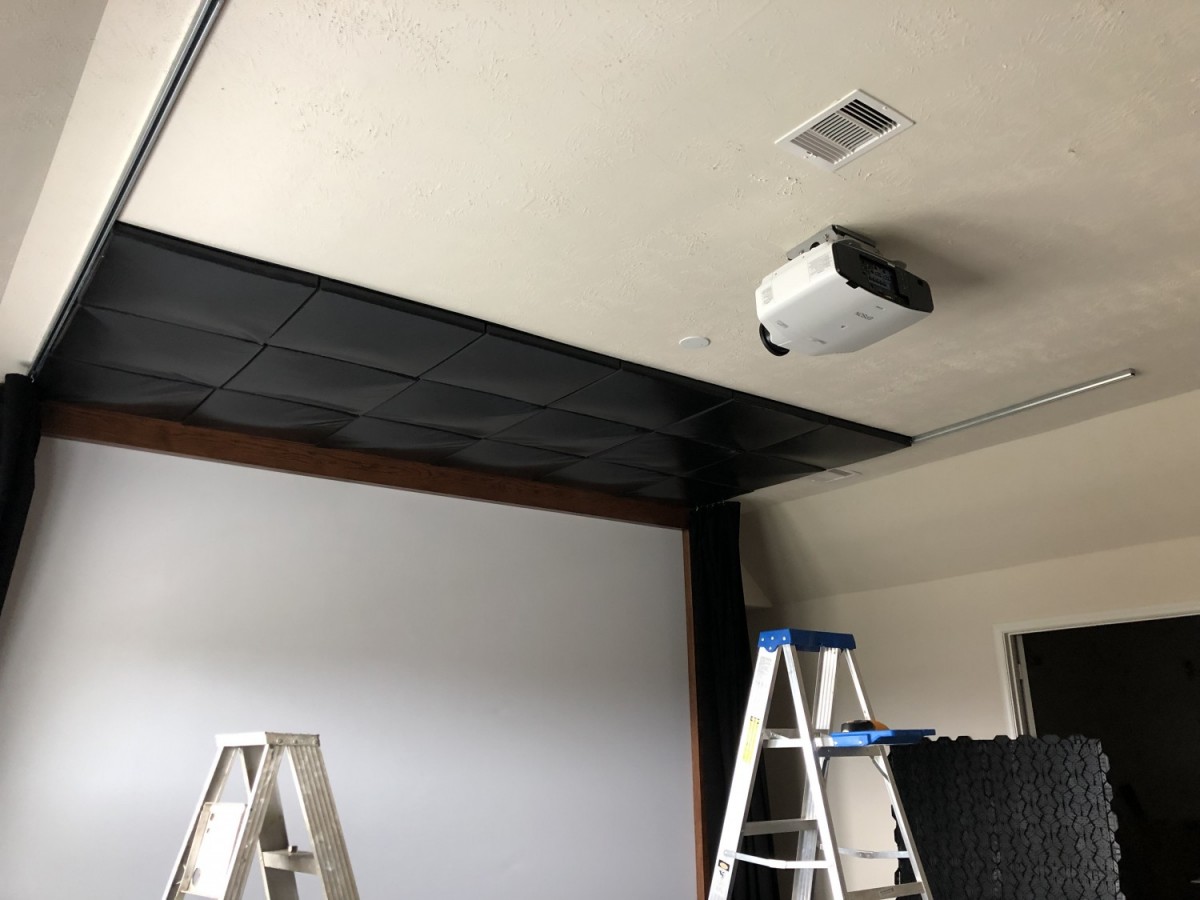


-
Building a Quality Golf Simulator
FlyboyAF replied to FlyboyAF's topic in Club Making/Repair & DIY Projects
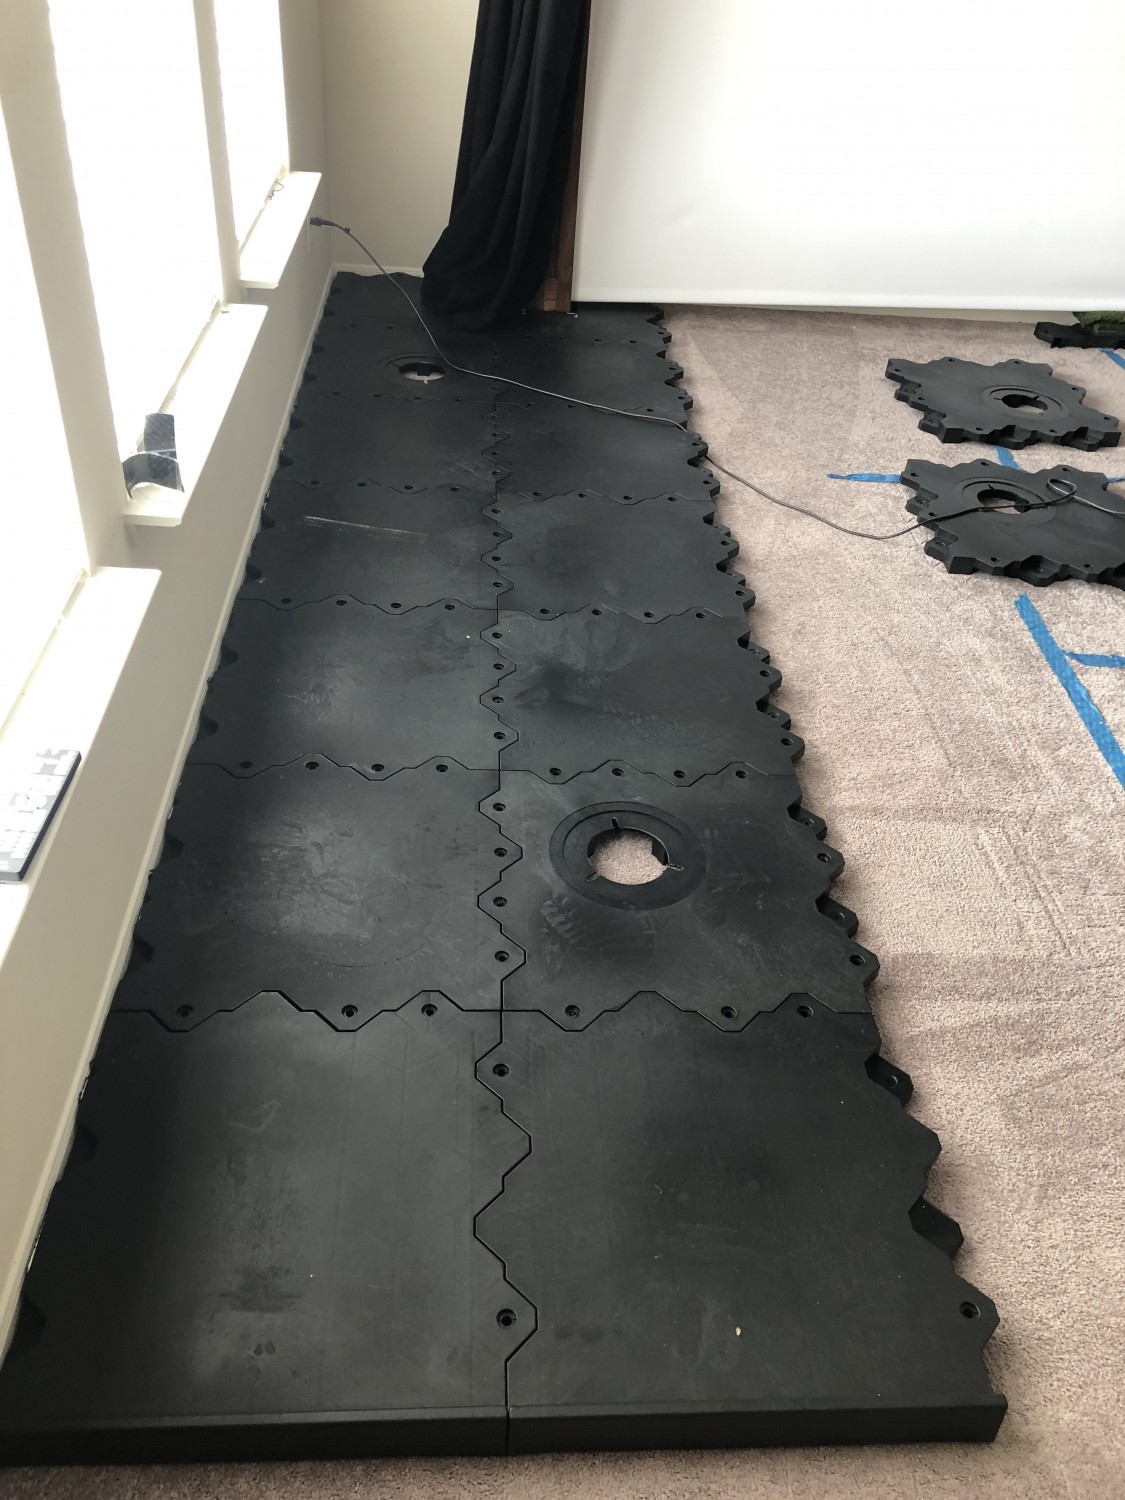
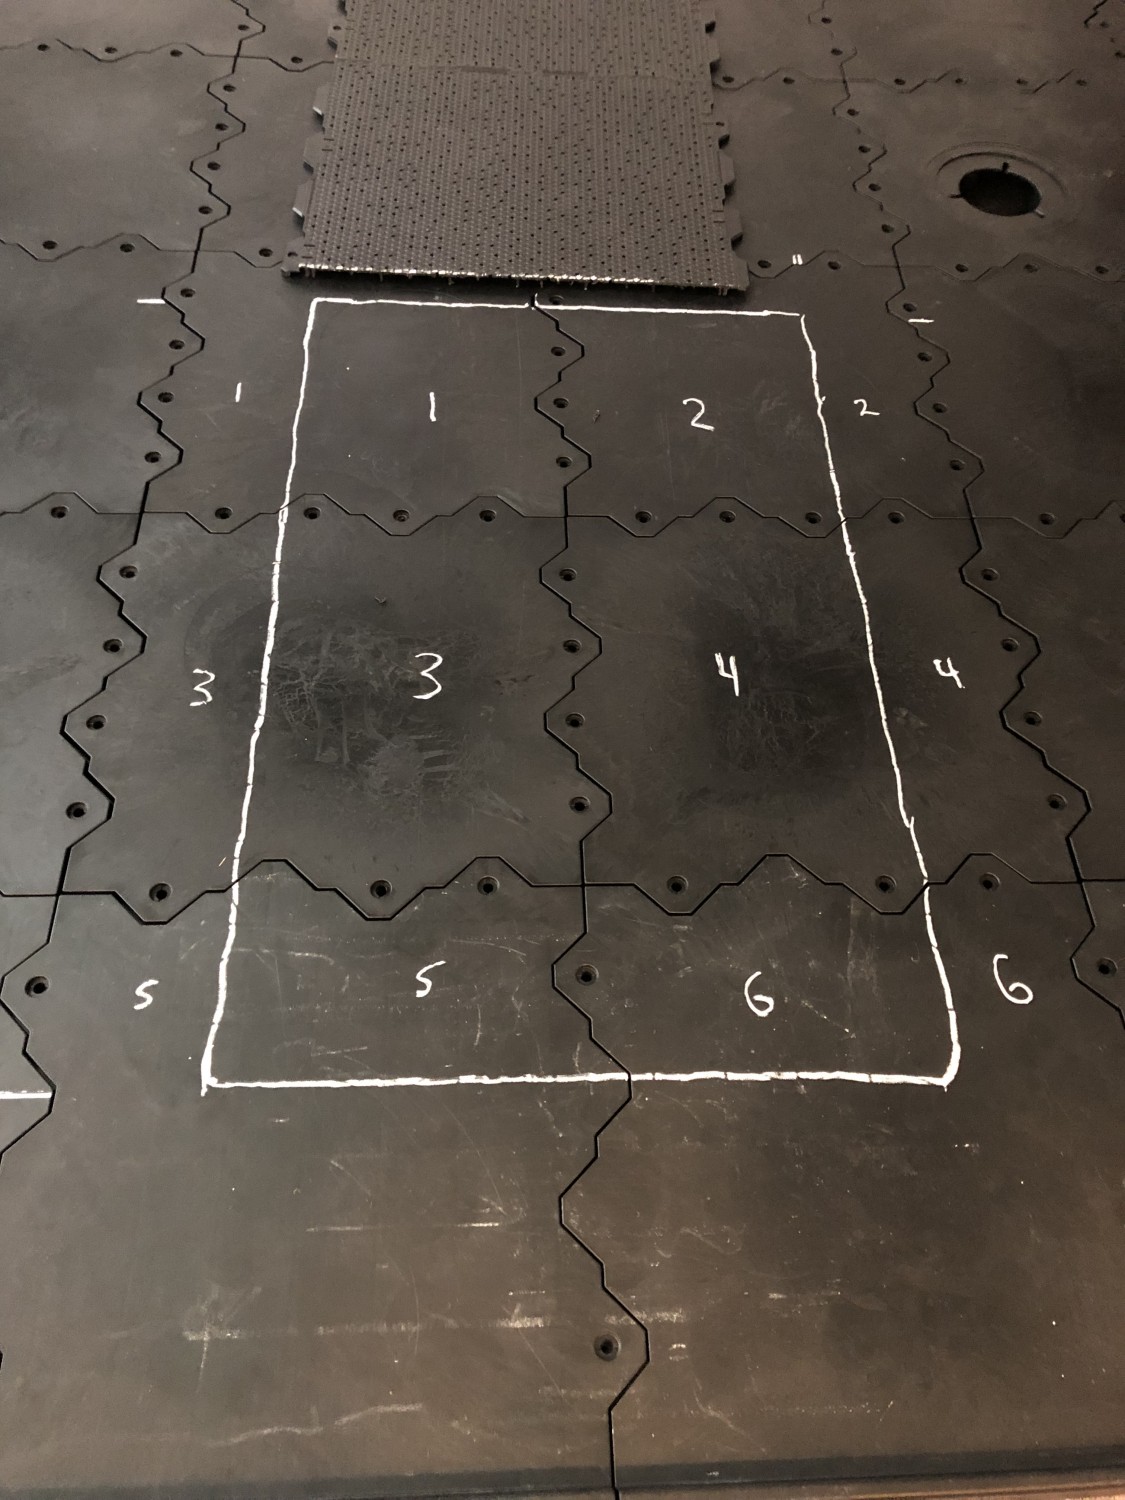
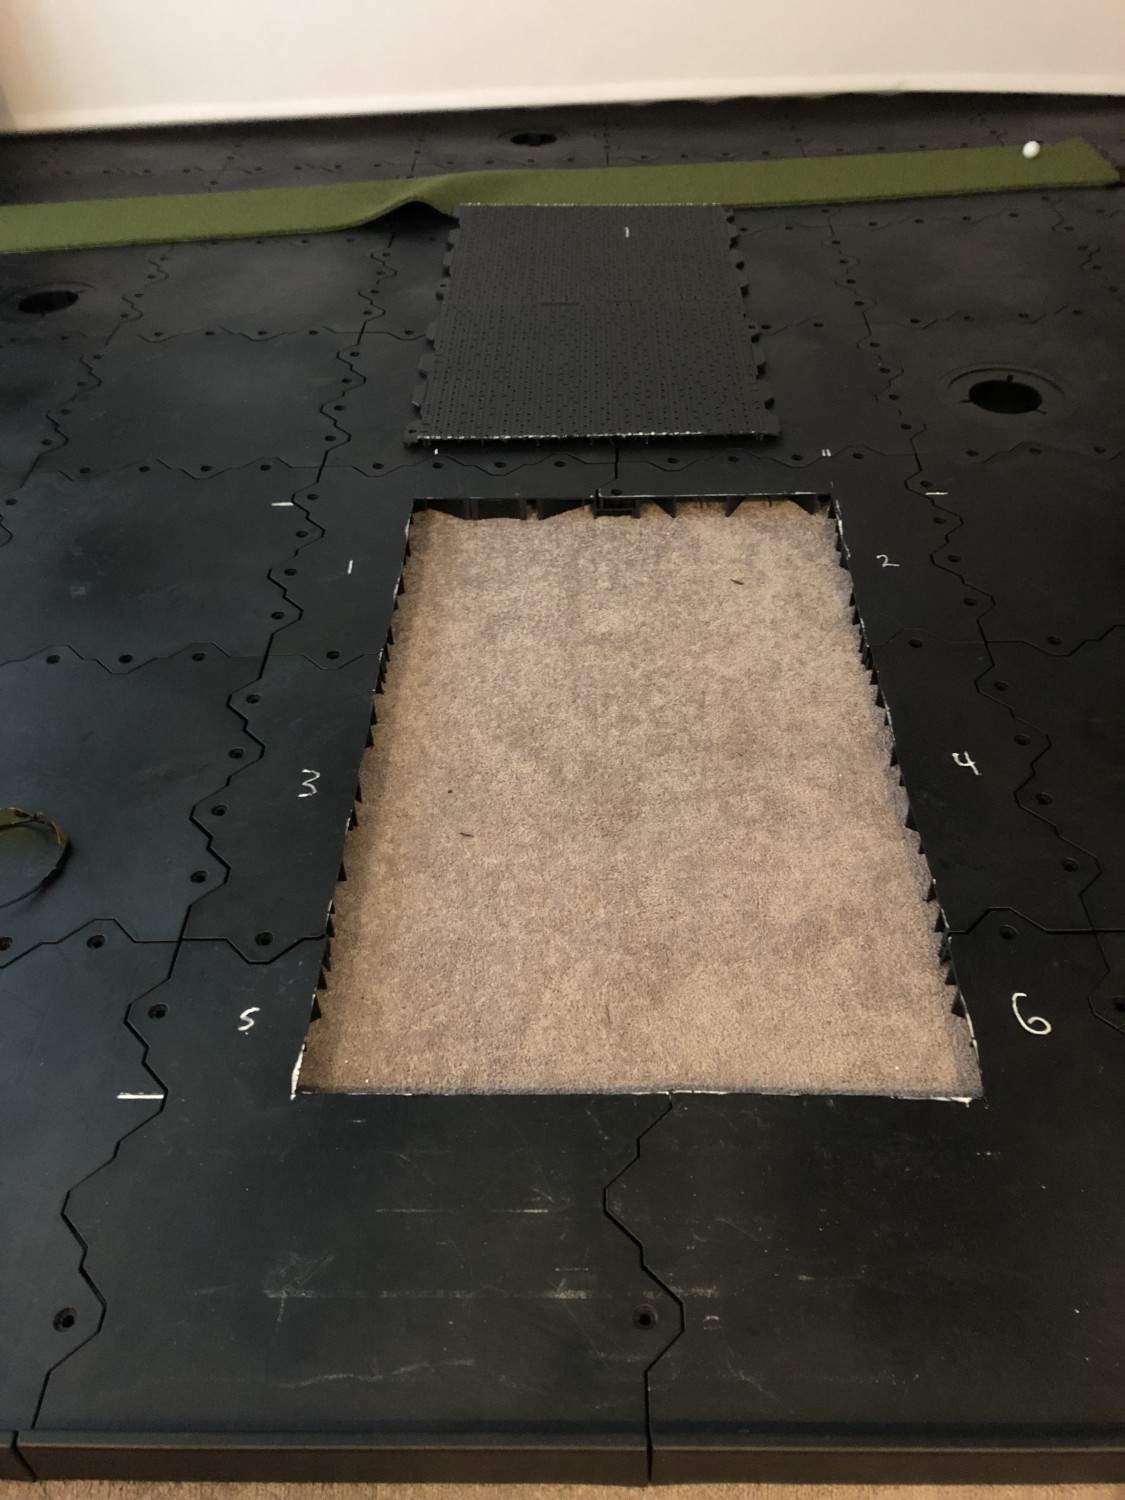
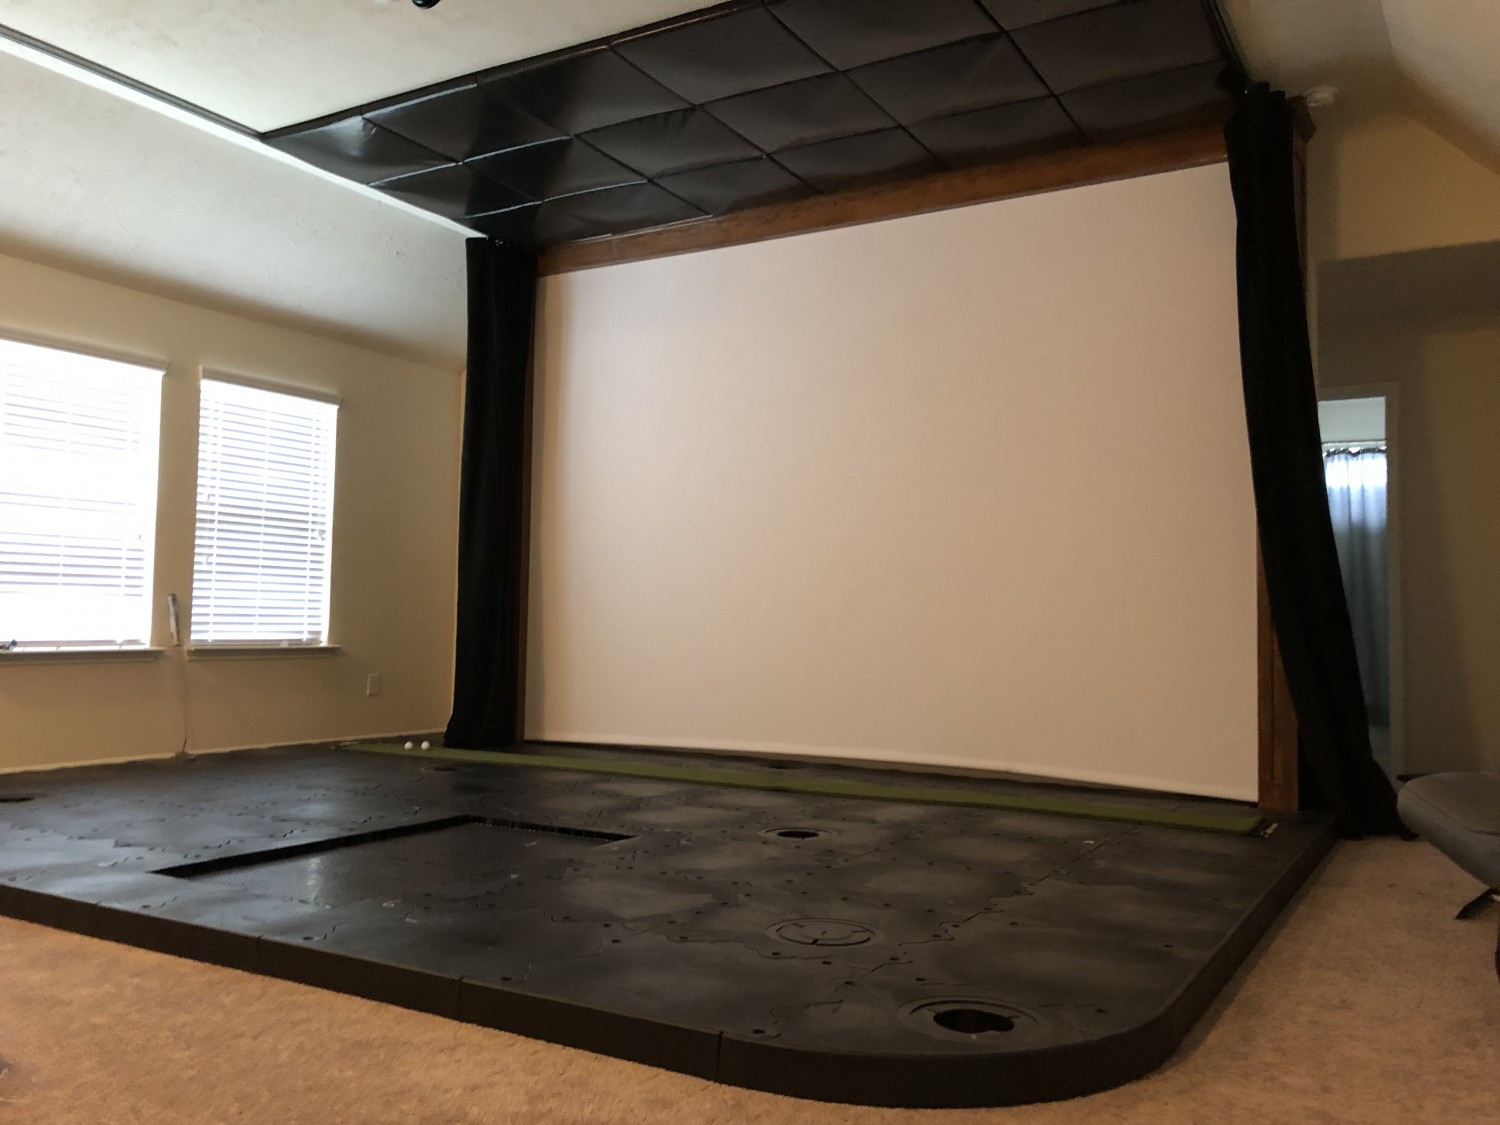
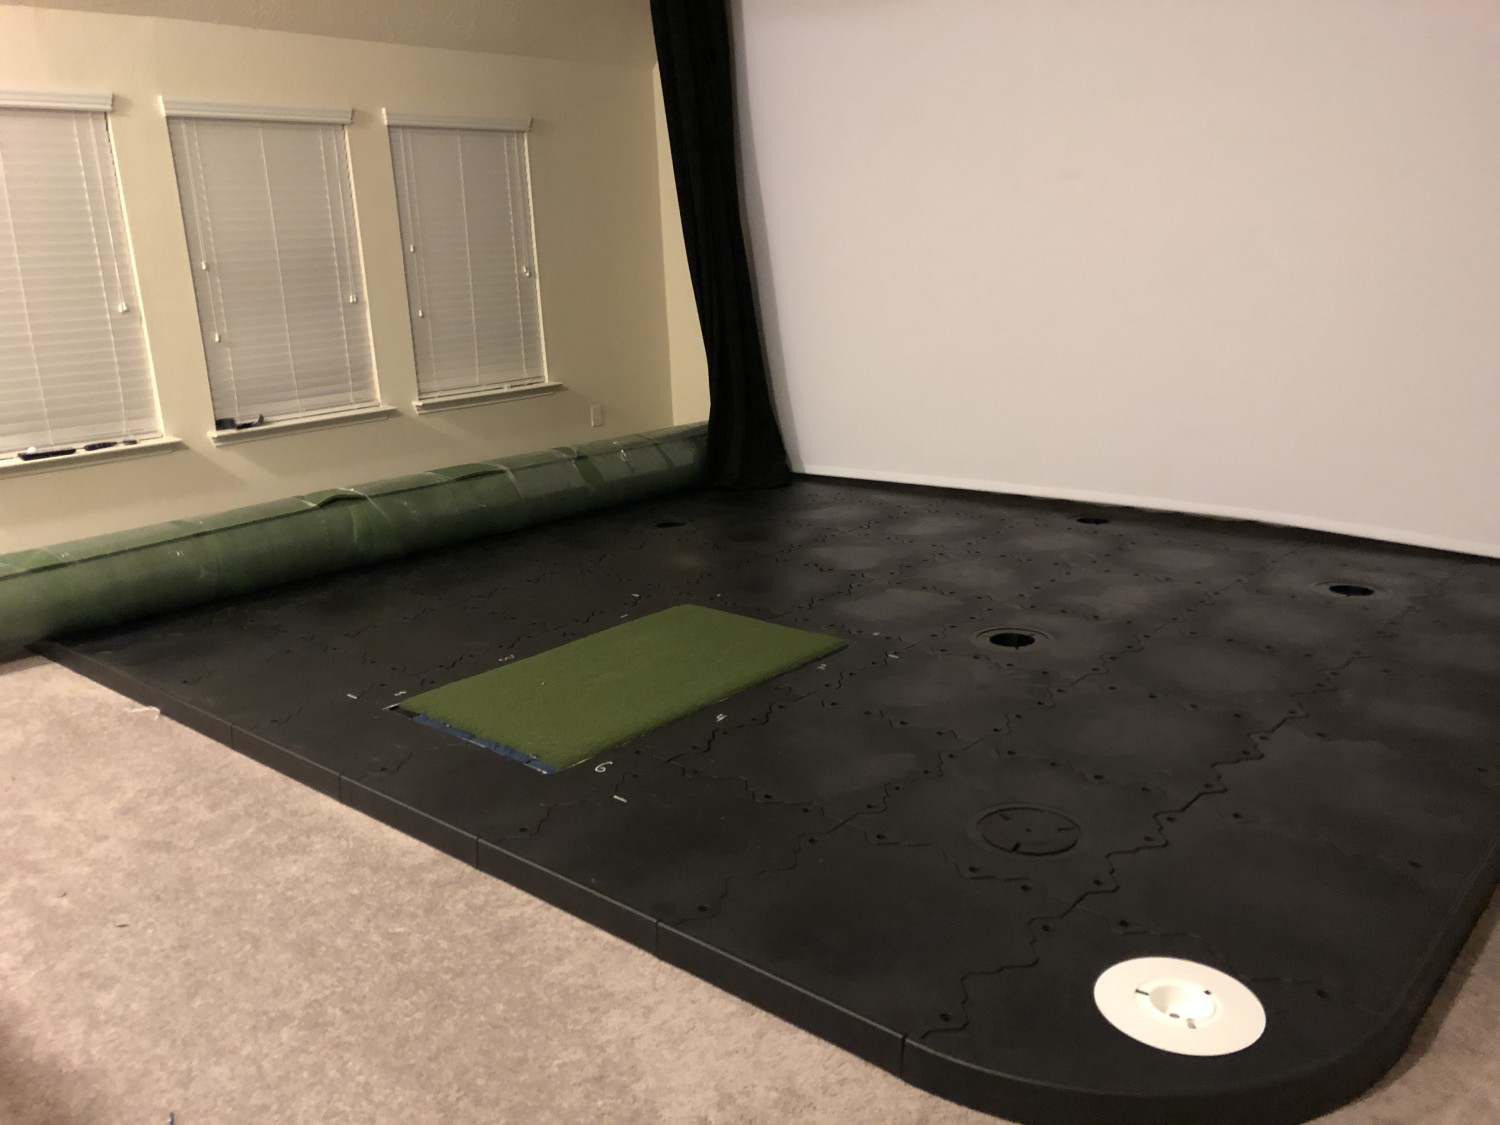
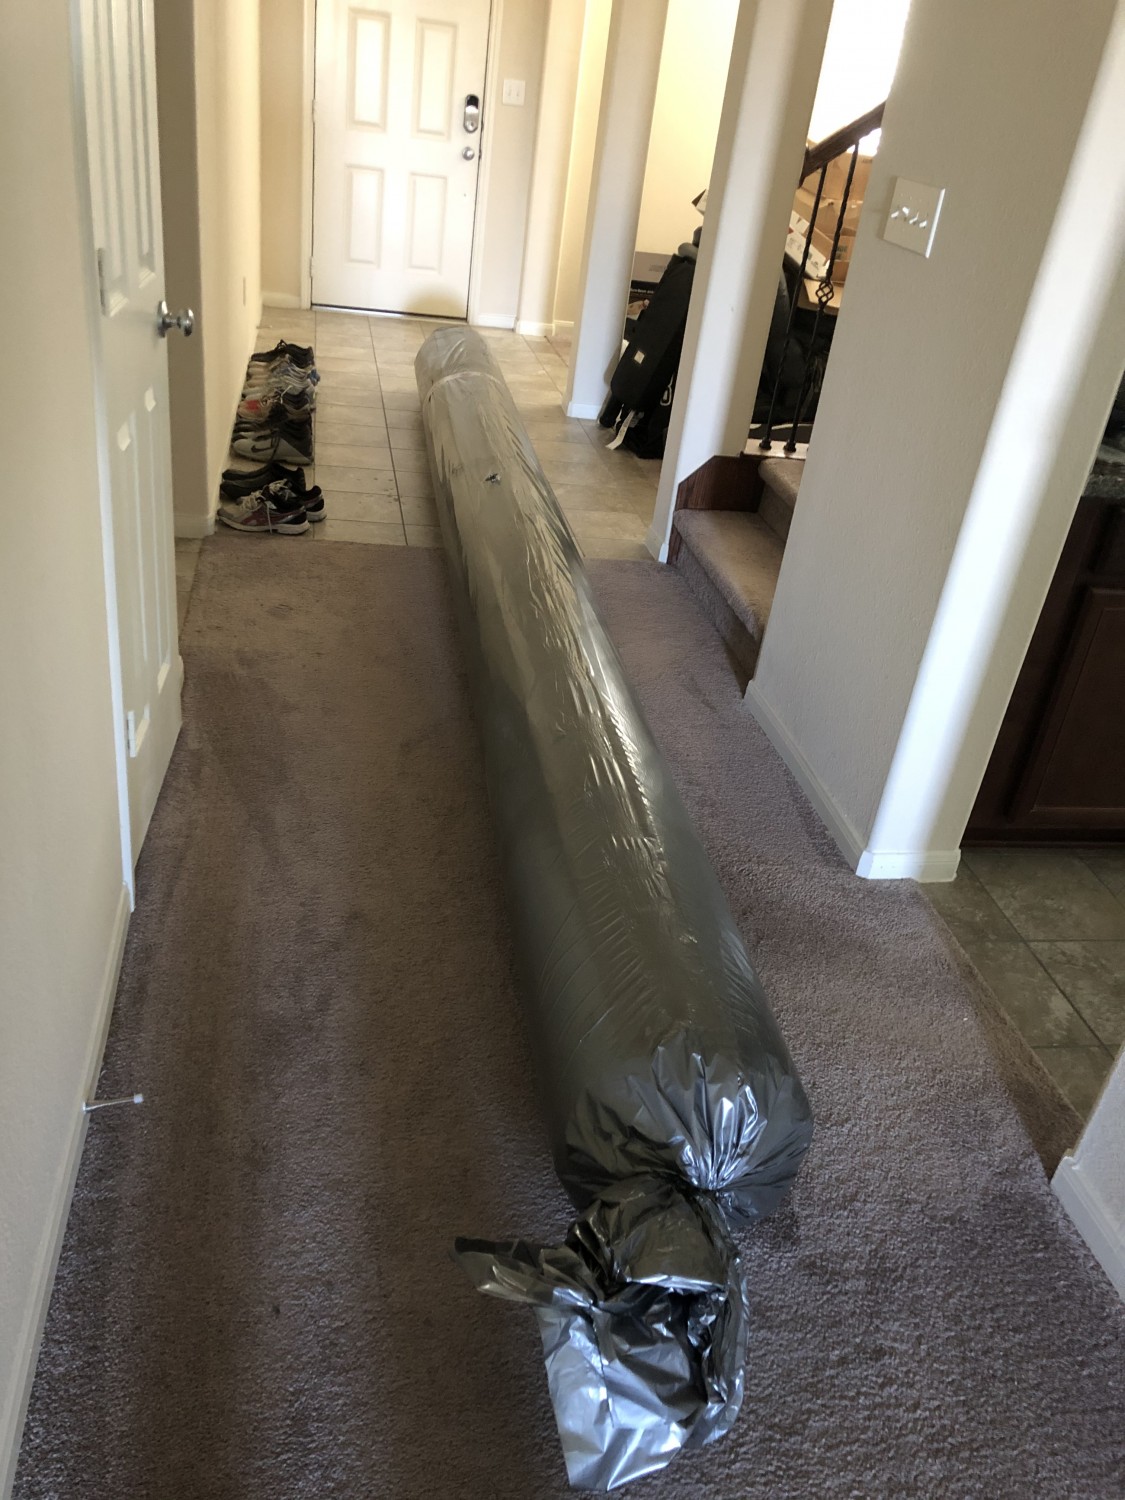
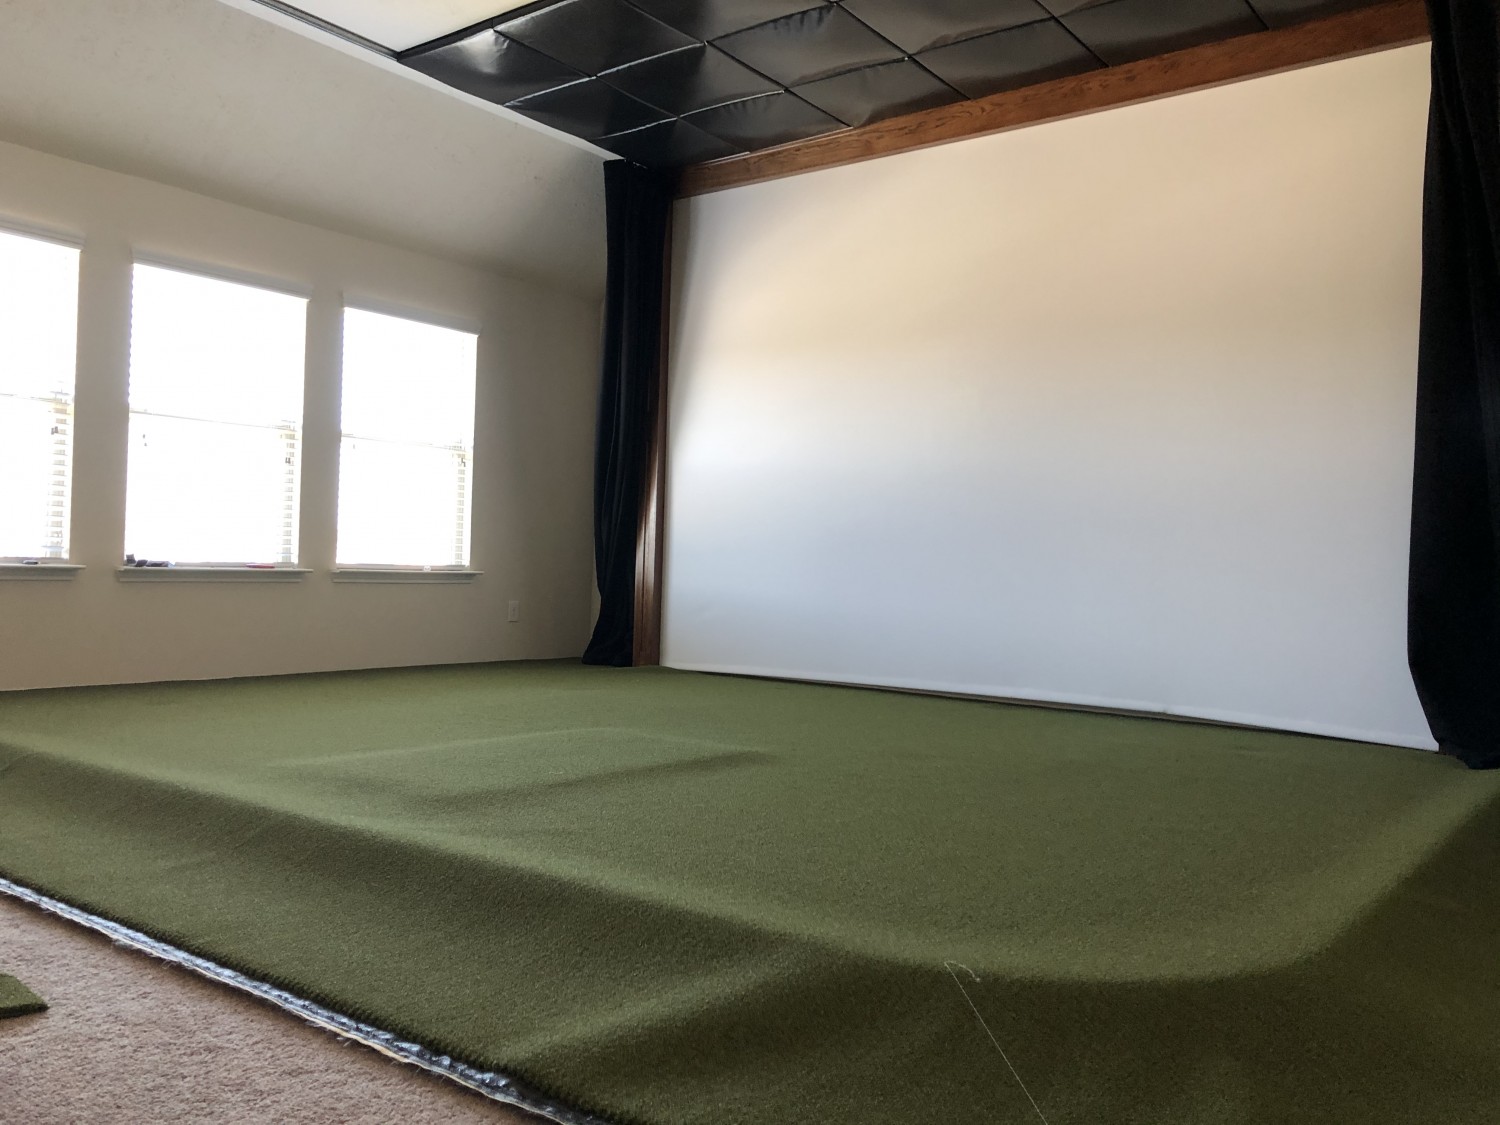
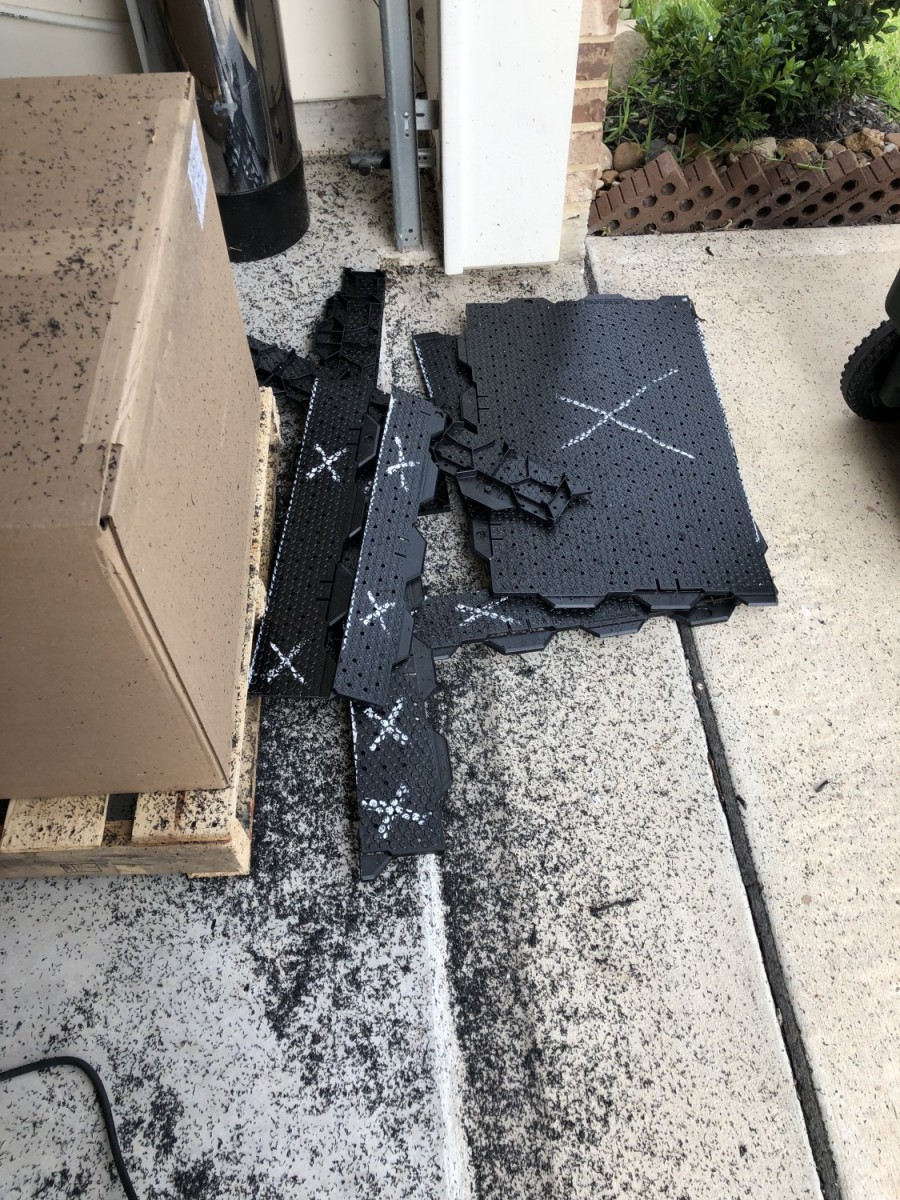
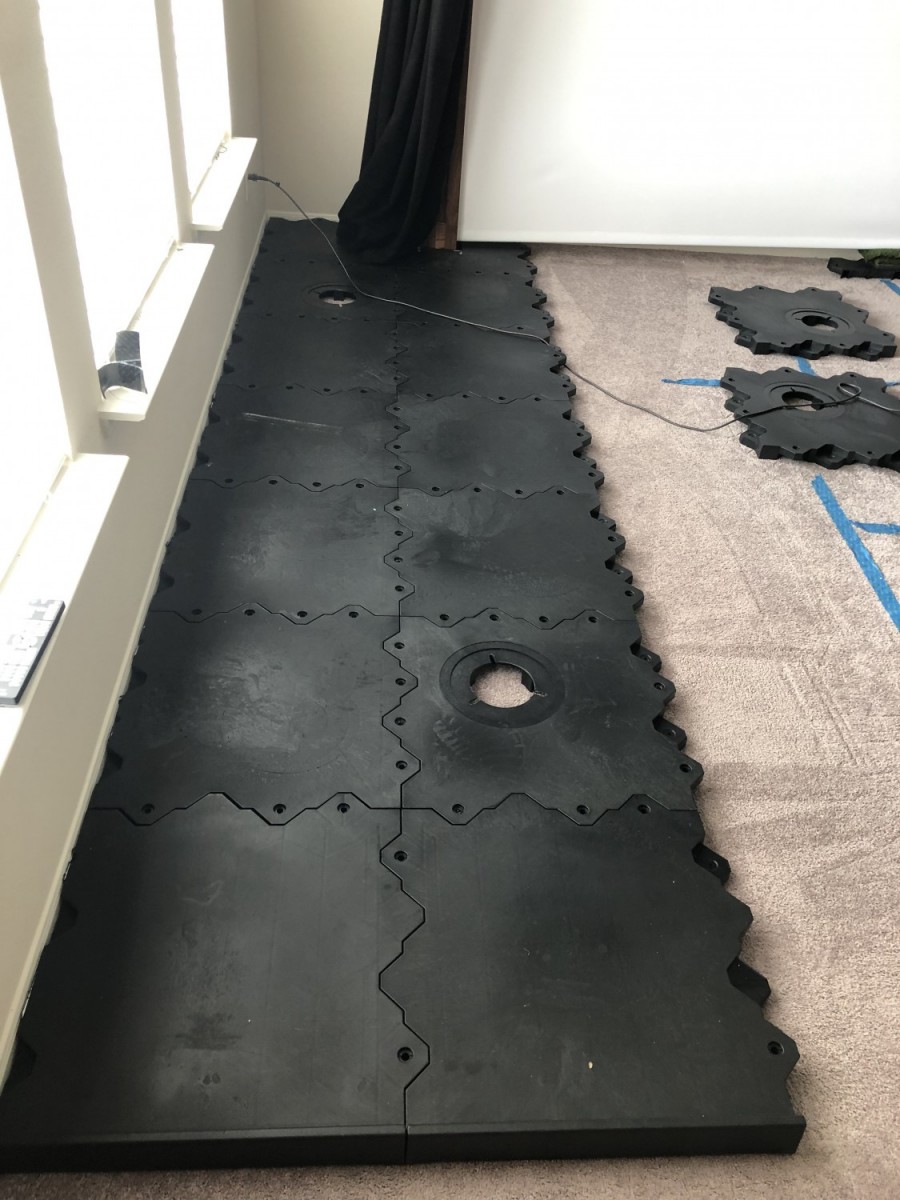
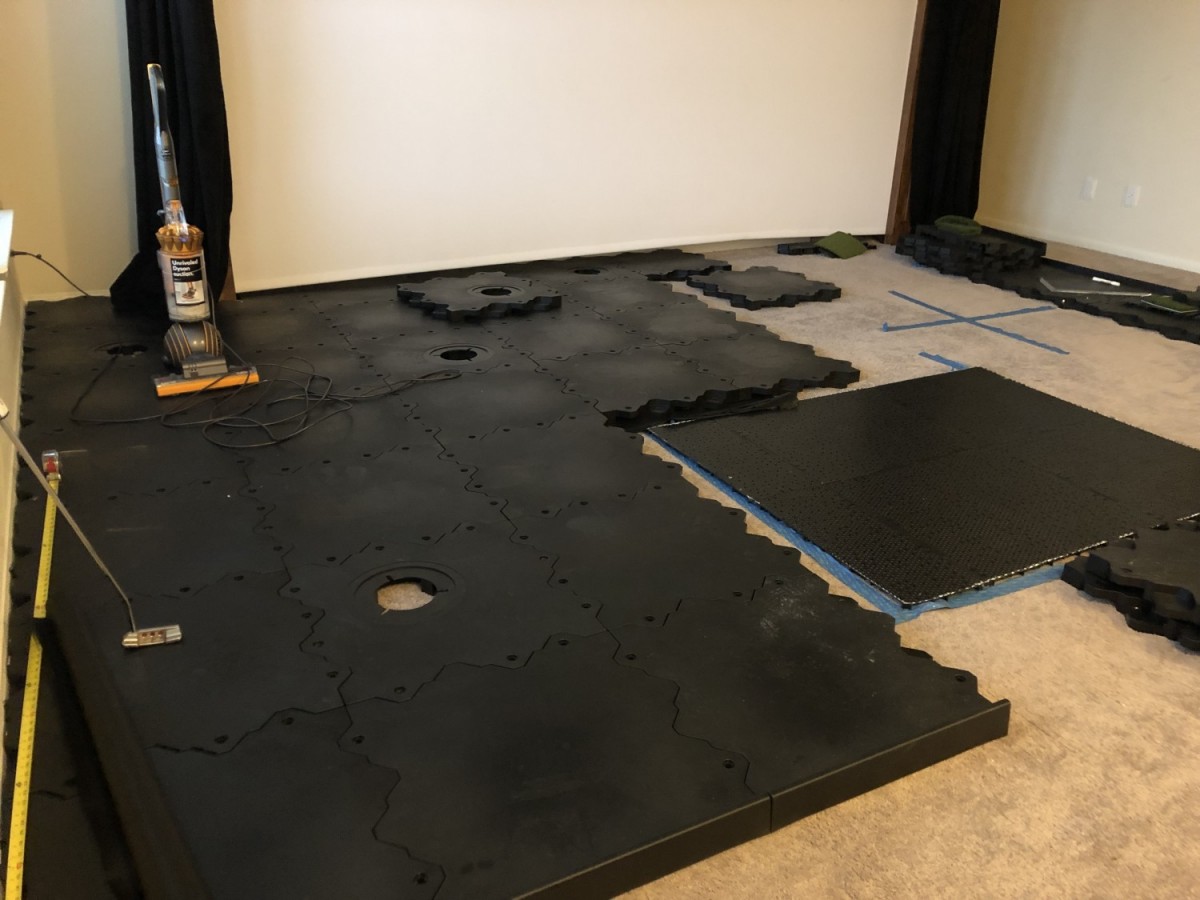
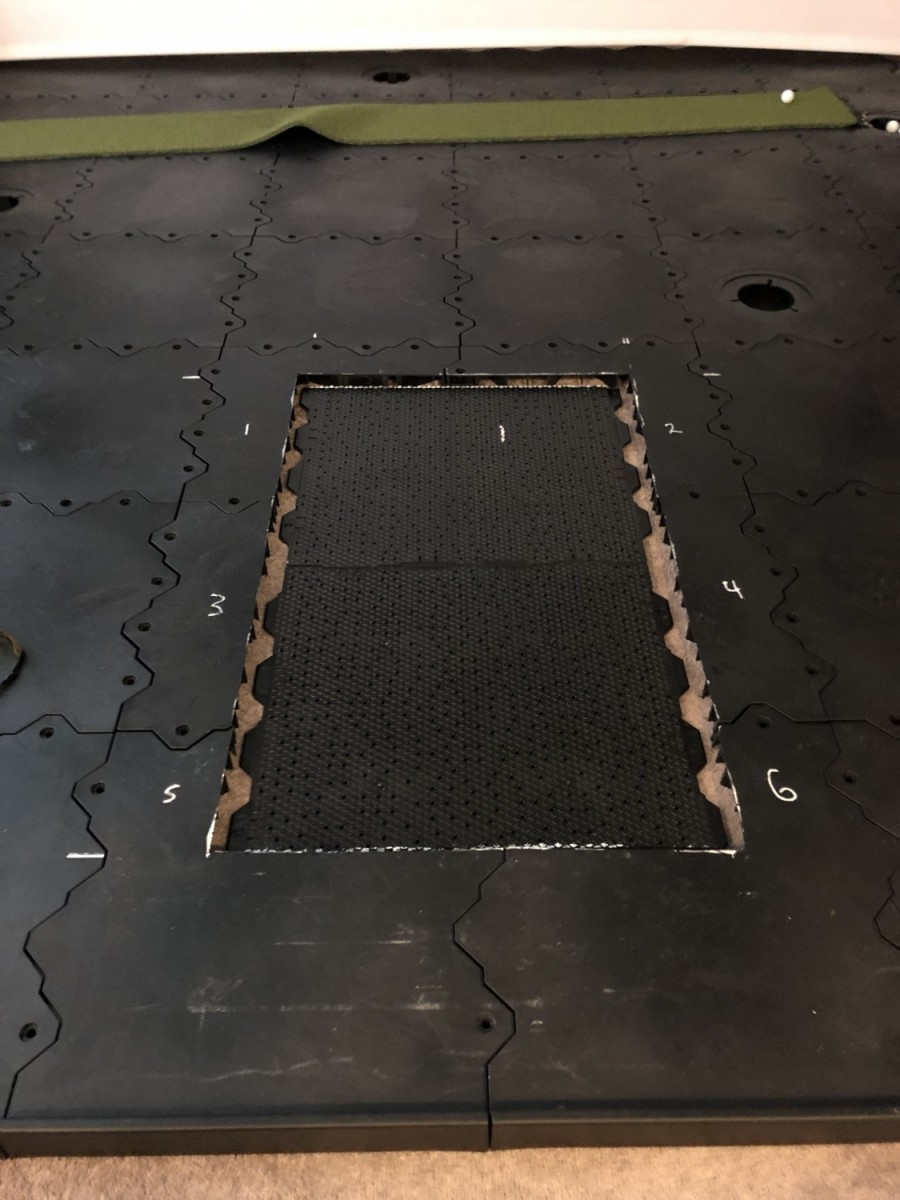
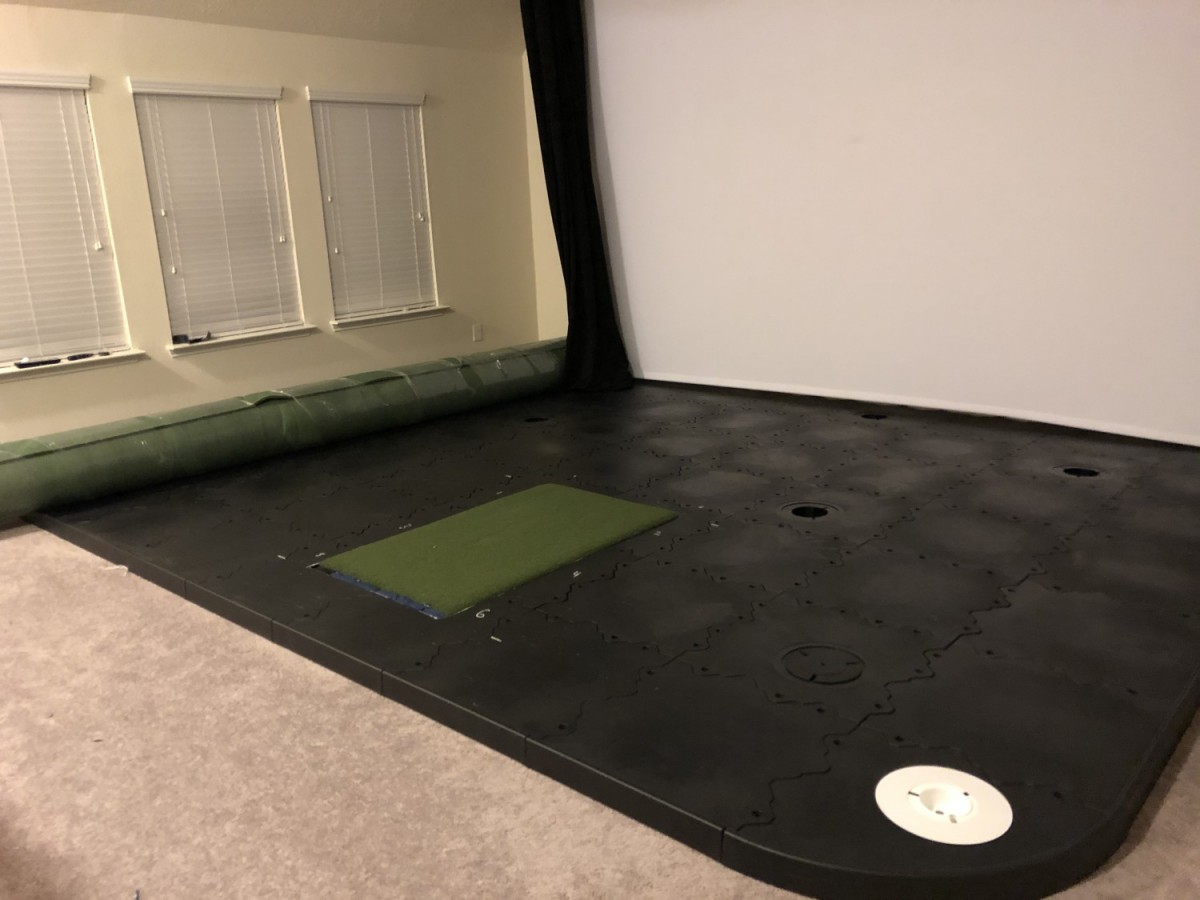
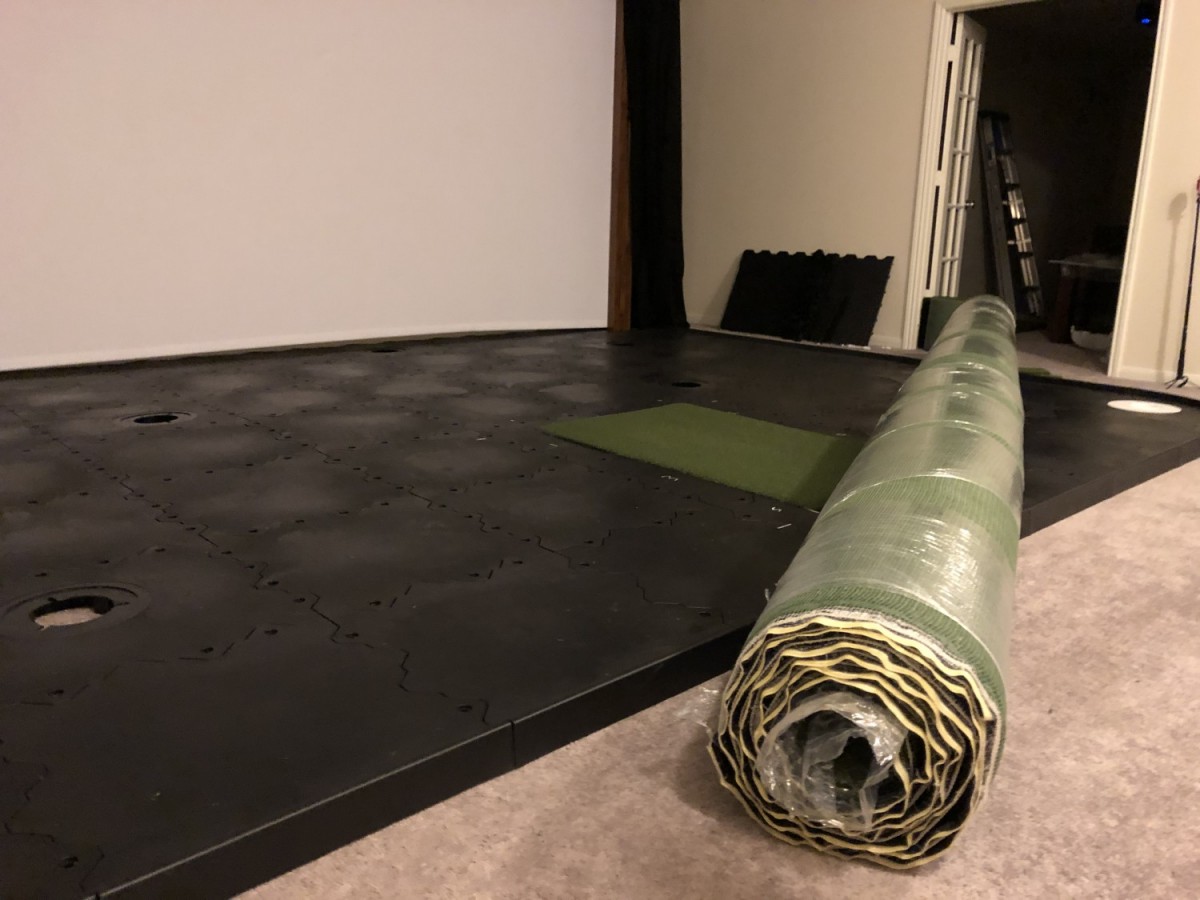
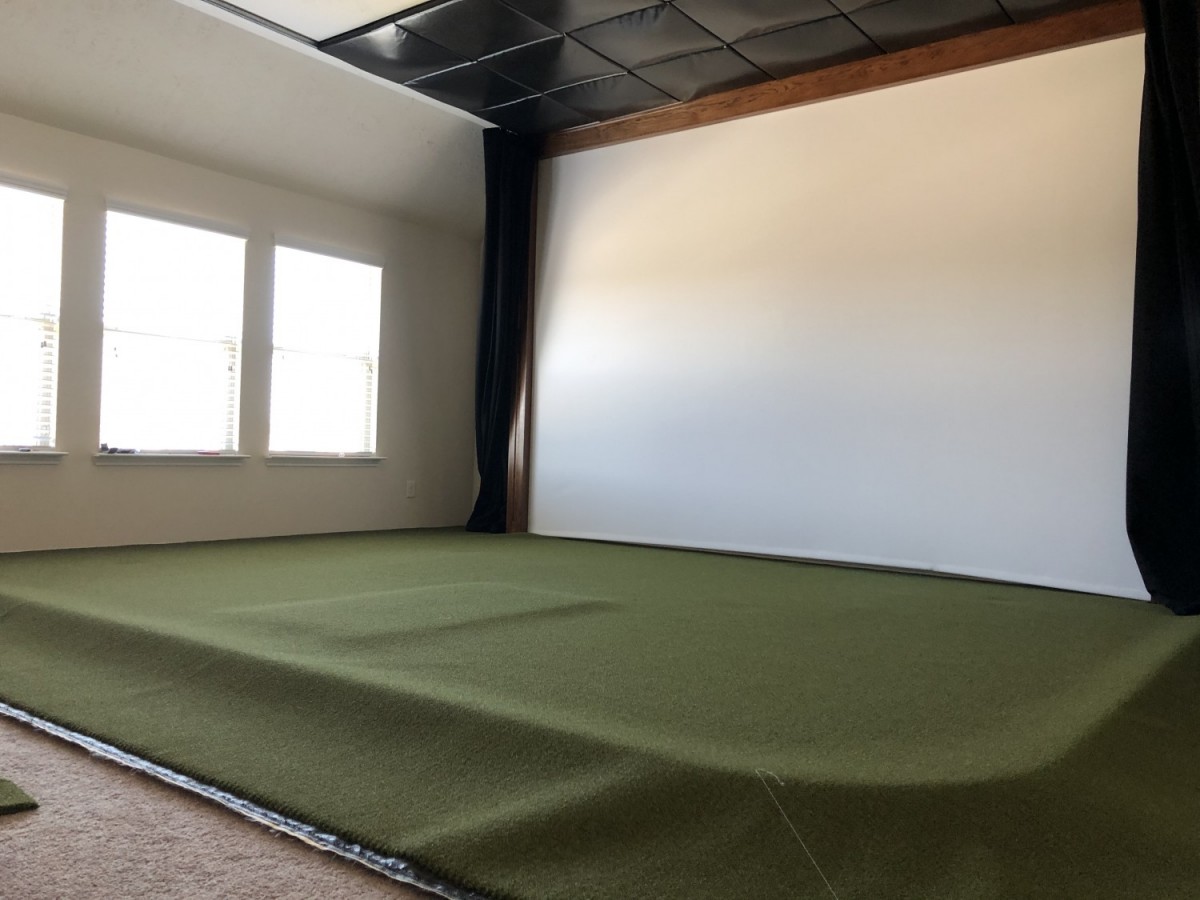
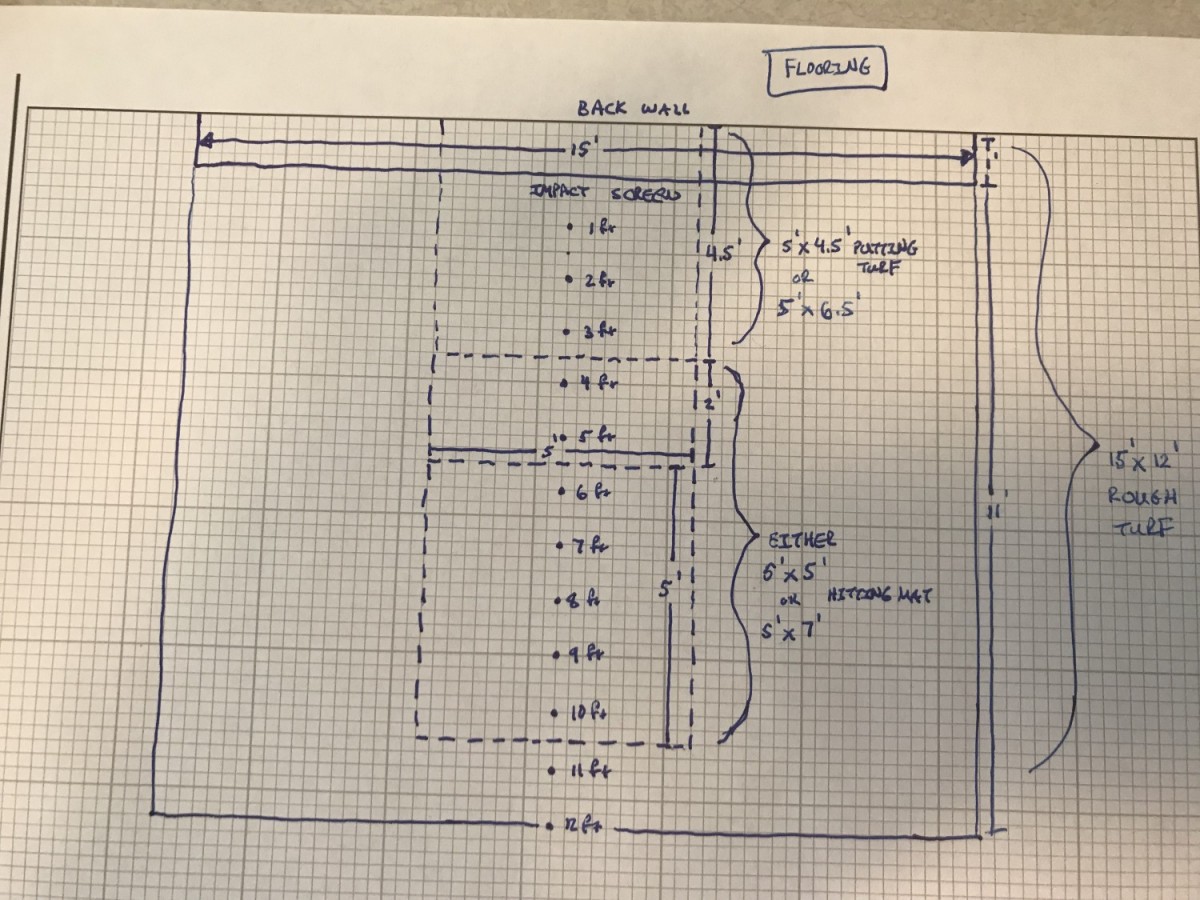
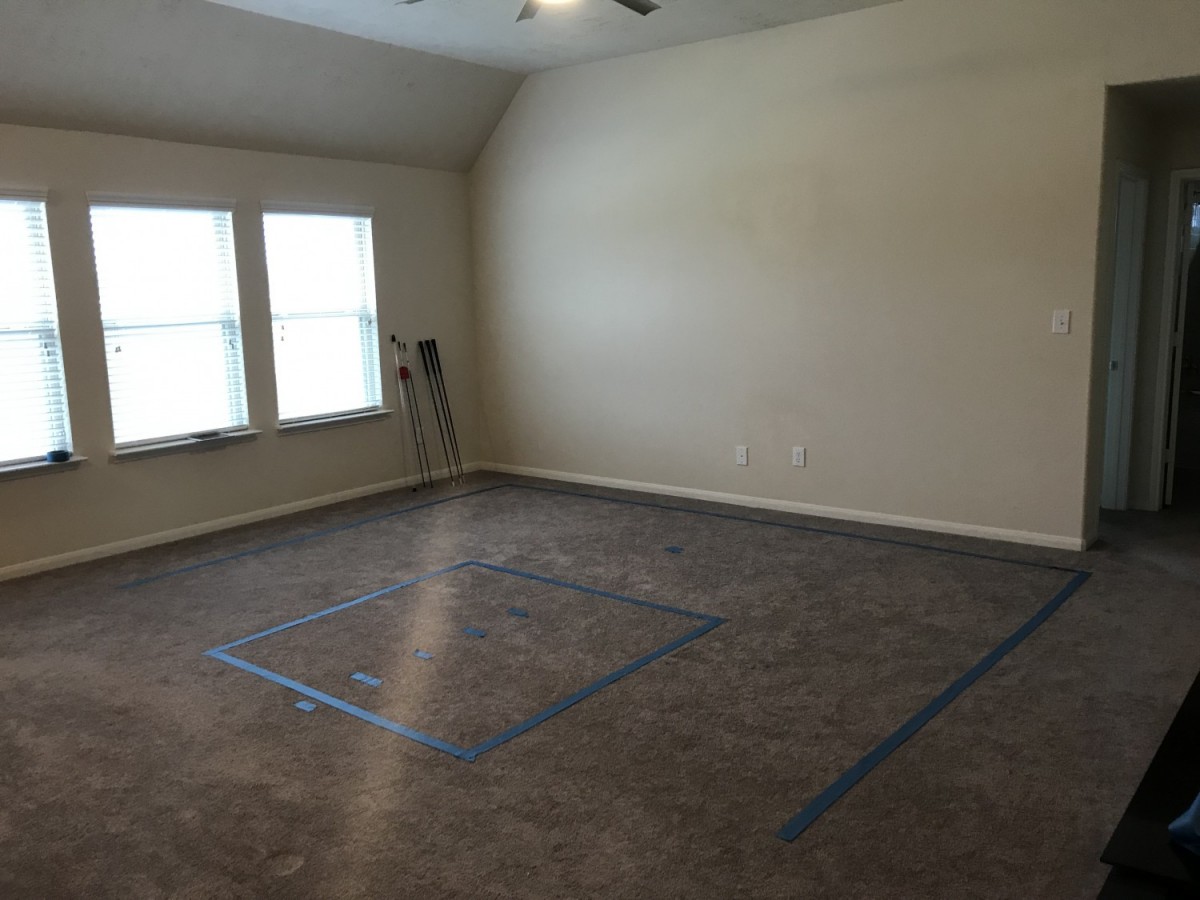
Stage 5: Sub Flooring & Turf Ok....this could be a long one. Sub Floor: There are many options here depending on what you're starting with. I built this simulator on the 2nd floor of my house, so I was working on top of carpet. Garage or basement applications where you are starting with concrete could require an extra step before laying out the sub floor if you aren't utilizing the whole space constricted on 3 sides of the room. The big question is do you want to have putting holes scattered around in your simulator space or not. If yes, do you want to have 2" tall cups or are you satisfied with something like a birdie ball setup that is really just a slight recess and a flag that stops your ball. If you don't care about having a real-ish golf cup, than you can skip this and just layout turf in your space. For anything else, you'll have to build up a sub floor to provide room for the holes. Option 1: DRIcore panels from Home Depot (3/4" x 2' x 2') - difficult to cut the wholes through the rubber base and tough to install Option 2: Sub floor construction from 2 x 4 wooden beams and plywood. A detailed approach to installation (dimensions, materials, instructions) can be found here Link: GSA DIY Building a Sub Floor Option 3: I found a company called Tour Links that is the standard for setups at the annual PGA Merchandise Show as well as the preferred choice for many college team practice facilities and professional golfers themselves. They are extremely easy to assemble (interlocking plastic squares) and if you ever move or decide to change up your layout, you can take it apart and reassemble it the way you want rather easily. Plan out where you want your holes to be and they will ship the panels with the holes already cut for your convenience. They also provide engineered foam circles (4' or 5' in diameter) that gradually increase in height up to 1/2" in the middle that you can place underneath the panels to help give you some undulation in your layout! I have 2 x 4' foam circles in my setup. My space has 7 different putting holes inside of a 15' x 15' area. You can view the different panel options used to build your own custom space at the link below... $3,344 Link: Tour Links Panels Putting Turf: Tons of companies brag about how they have the best putting turf out there. I received about 10 different samples (1' x 15') to put them to the test. In the end it came down to a choice between turf from Pro Putt Systems and Synthetic Turf International. For inside applications, Nylon turf is the way to go. They last a long long time and don't require any sand infill to increase stimp speeds. They roll pretty true. I ended up going with a 1/2" pile (tall) NP55 turf in forest/olive from Synthetic Turf International. It comes in 15' wide rolls that you can customize to whatever length you need (I went with 15' x 18' to that I didn't have to seam parts together to cover my subfloor). I stimped the turf upon delivery at 10. I purchased a roller and rolled the area 3 times (280 lb) and that increased the stimp to 12 (IMPORTANT: increase your speed slowly - 1 pass at a time because you can't make it slower if you've gone too far lol) This turf was also relatively easy to cut which was important when it came time to cut out the putting holes and trim the edges to fit the subfloor space. All I needed was a stencil and a utility knife. I used double-sided tape around the perimeter to add some adhesion to the plastic sub floor also (and around the hitting mat area in the middle). Considerations: My installation was up a narrow set of stairs. The roll weighed 250 lb and had a stiff cardboard tube through the center of the roll. Lots of geometric manipulation was required to get this thing from my downstairs foyer to the sub floor upstairs. Plan ahead to ensure you can actually get the turf to where you need it! Pile height is also important. There are options for 3/8" & 1/2" pile heights from STI. My subfloor was 2" high in addition to the 1/2" pile from my putting turf. This becomes important because the hitting mat turf that is in the middle of the putting area needs to be the same height as the surrounding area so that everything is flush. $1,685 Link: Synthetic Turf International NP55 Hitting Mat Turf: The best that I found out there in this arena was hands down the Real Feel Golf Mat from Country Club Elite. The biggest difference between this mat and the rest is that if you actually hit a fat shot on this turf, you will actually hit a fat shot! There is no "bounce" up into the ball like there is with most other mats out there (great for improvement and easy on your wrists). You will improve your ball striking by mimicking the interaction you would have on real grass instead of masking poor technique. This turf is extremely durable and wont leave material stains on the bottom of your clubs either. Many size options are available. I purchased the 5' x 4' mat (2" thick) and cut it down to a 2' x 5' strip to insert into the simulator space. In order to make the height match the putting area around it, i used a 1/2" tall Champion Panel from Tour Links underneath. $434 Link: Country Club Elite Real Feel Golf Mat If you don't want or need the putting area discussed above, you can order the 5' x 5' or 5' x 10' mat and hit balls using this for your stance space also. It is hefty and shouldn't move around when you hit.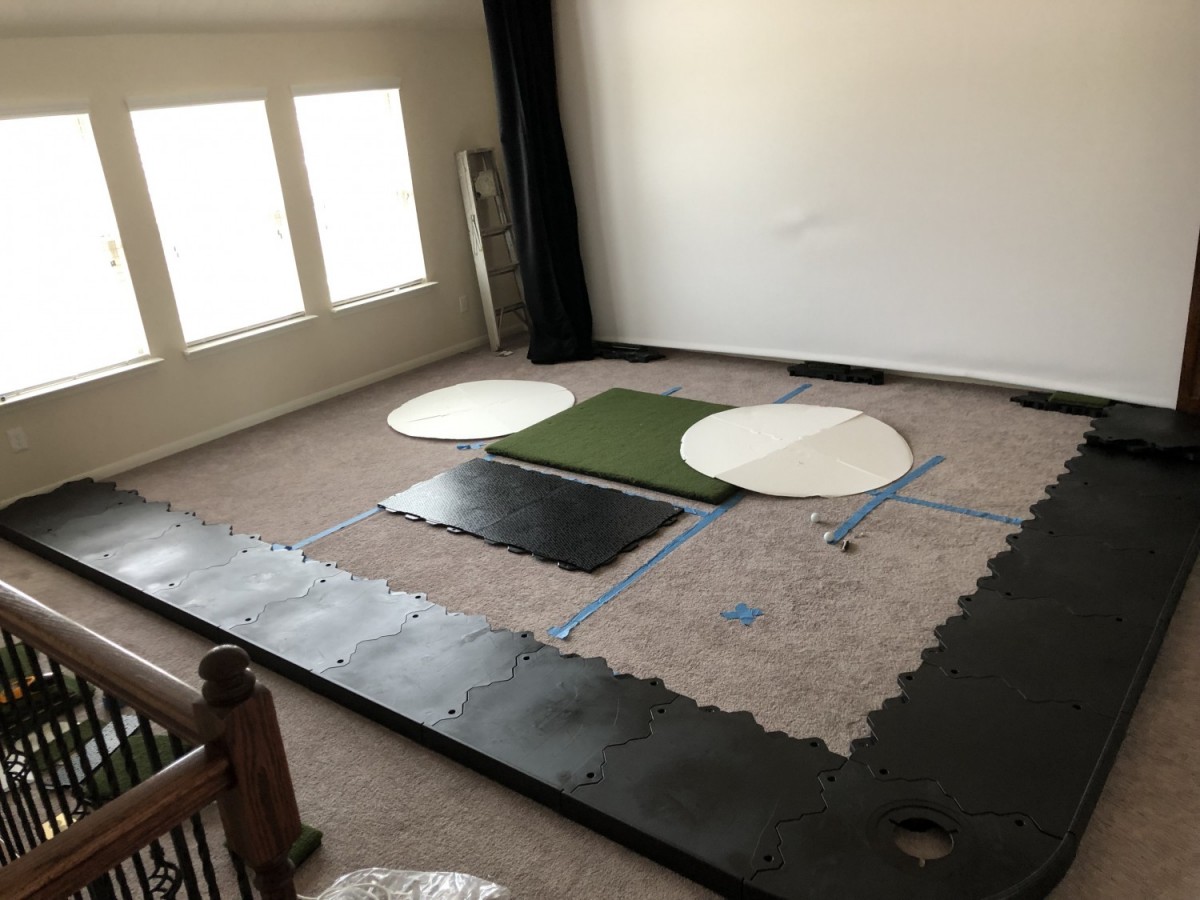


-
Building a Quality Golf Simulator
FlyboyAF replied to FlyboyAF's topic in Club Making/Repair & DIY Projects
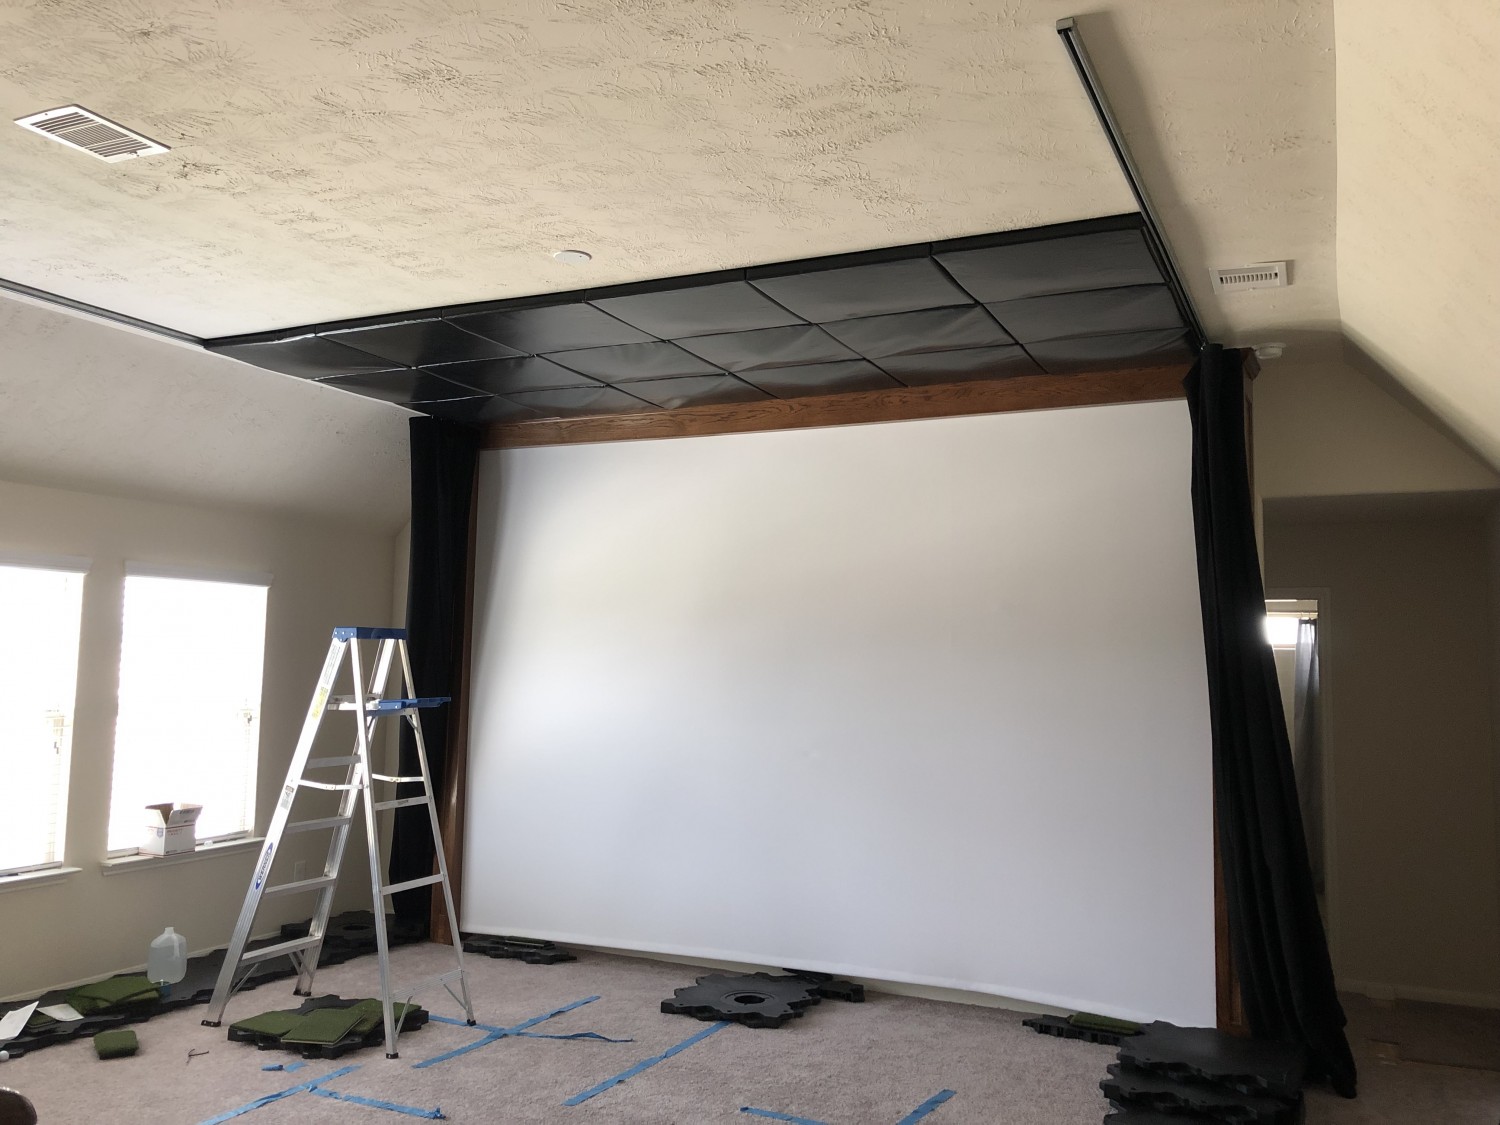
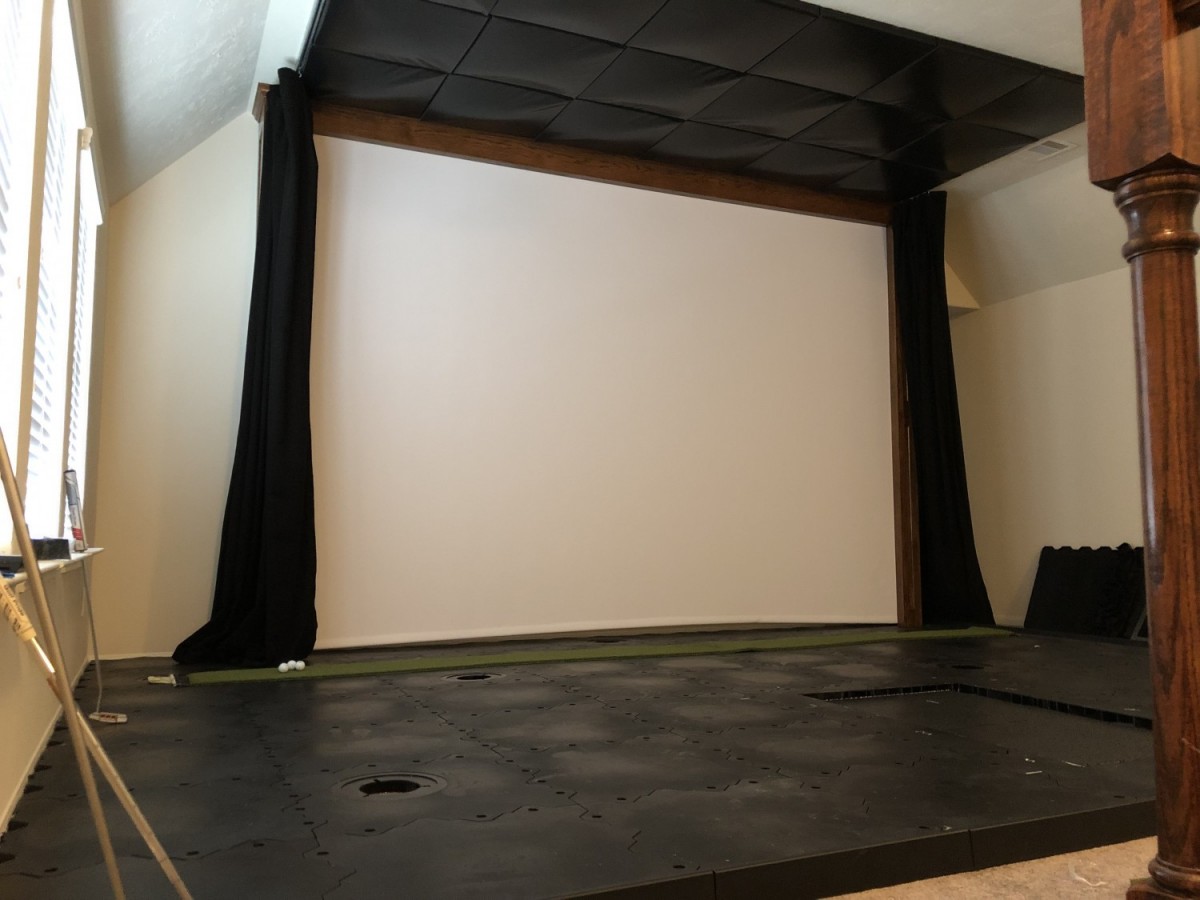
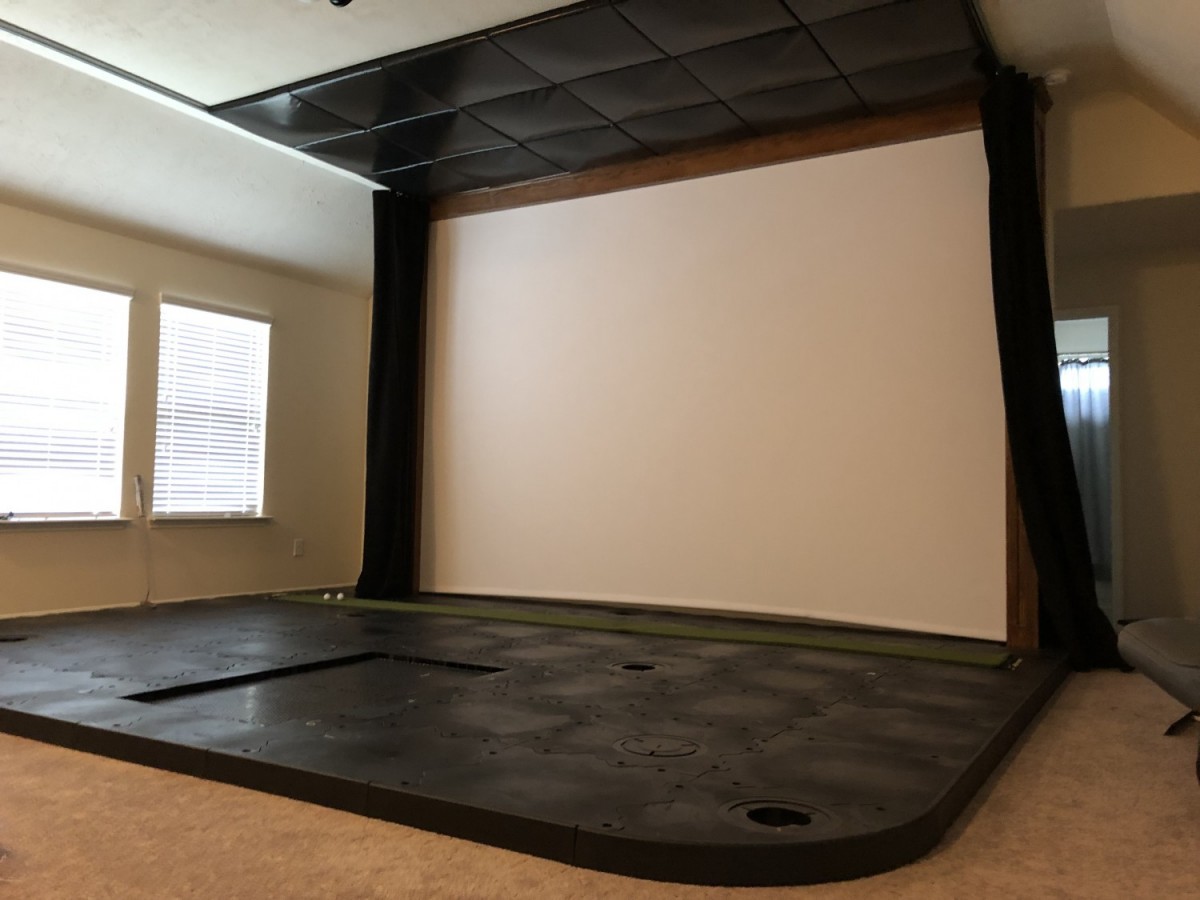
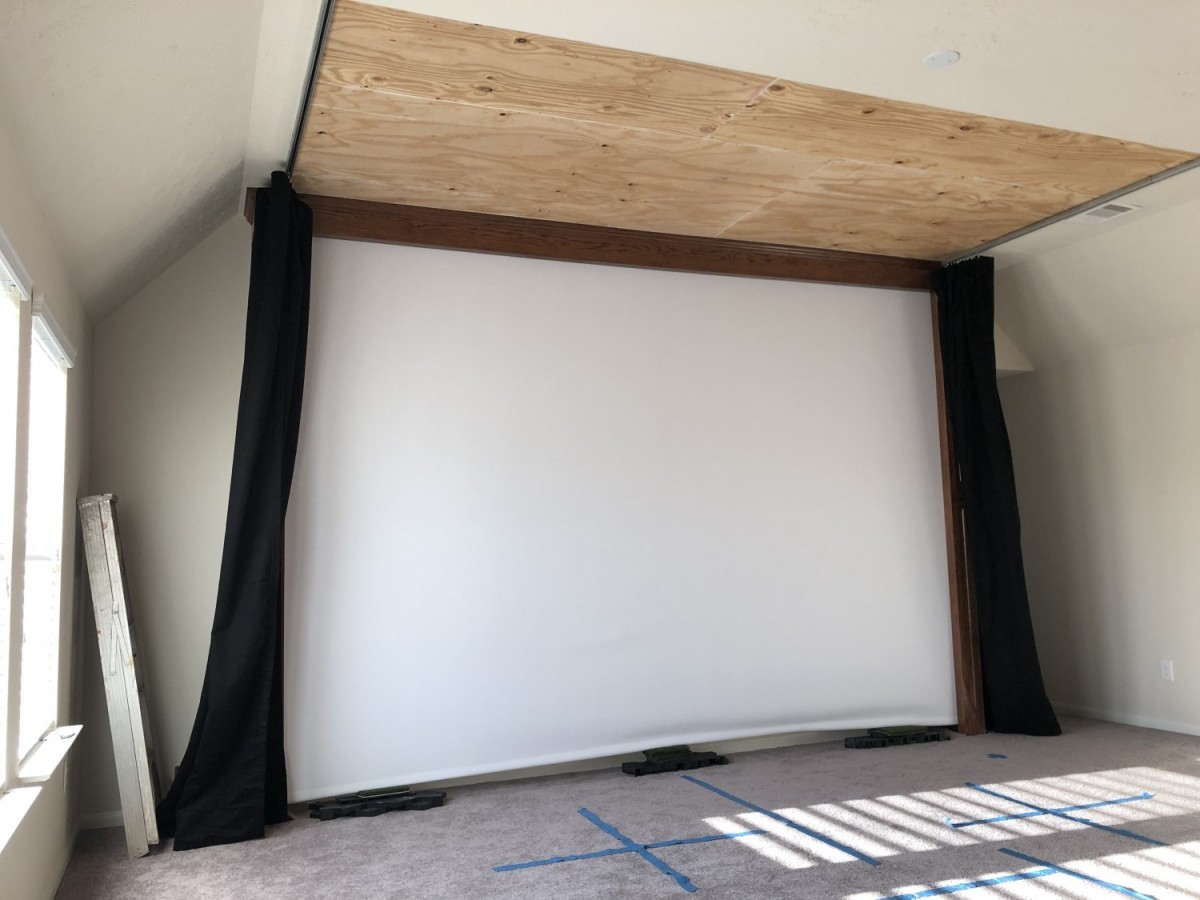
Stage 4: Ceiling Protection This was a funny topic to research as people are extremely creative when it comes to ceiling protection. Some individuals used staples or glue to attach foam panels to their sheetrock. The foam panels that most people tried were Acoustic Panels like the type you would find in a music studio....great for sound dampening, but horrible for stopping a golf ball traveling at a good velocity. The foam in these panels is dense which makes the material act more like a spring than a velocity dampener. Luckily I found a company with a better solution that works incredibly well. It wasn't cheap, but man....it looks fantastic and deadens the little shanked projectile of death heading for your cranium! The solution comes from Par2Pro (Canada). They sew velcro strips into vinyl covers over 1.5" or 2" thick slabs of high-density memory foam cut to your specification to meet the square footage requirements of the space (2 - 4 lb each). You pick the vinyl....patterns, solid colors, really dealer's choice. They send you long strips of the firm velcro side that adhere to a clean surface such as plywood. Once you have layed down the velcro tracks, you simply attach the finished pads via velcro and you're left with a good looking functional ball stopper! $2,765 Par2Pro Customer Service This is hard to find via their website, so just call the customer service folks and inquire about the foam pads for more details. These also work the same for side-wall protection in case you decide not to use drapes...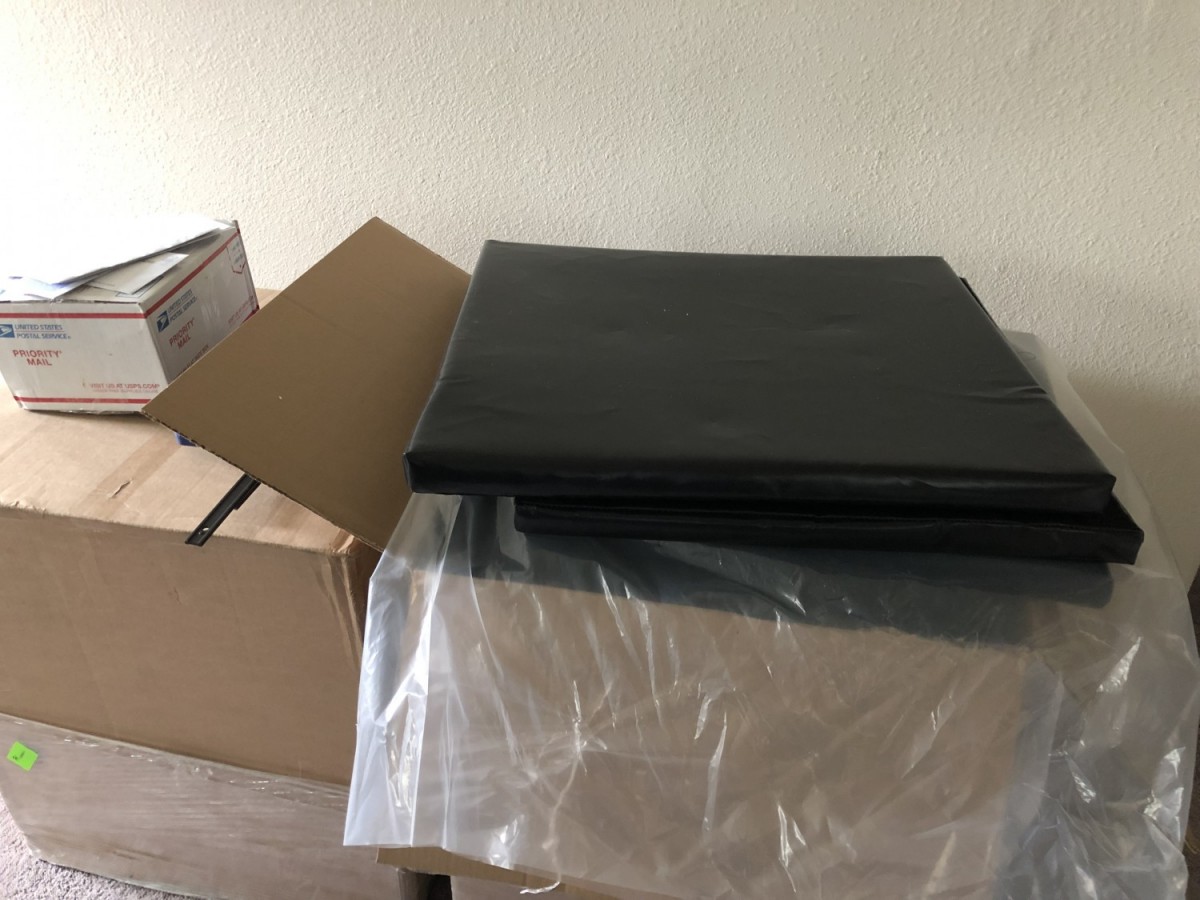

-
Building a Quality Golf Simulator
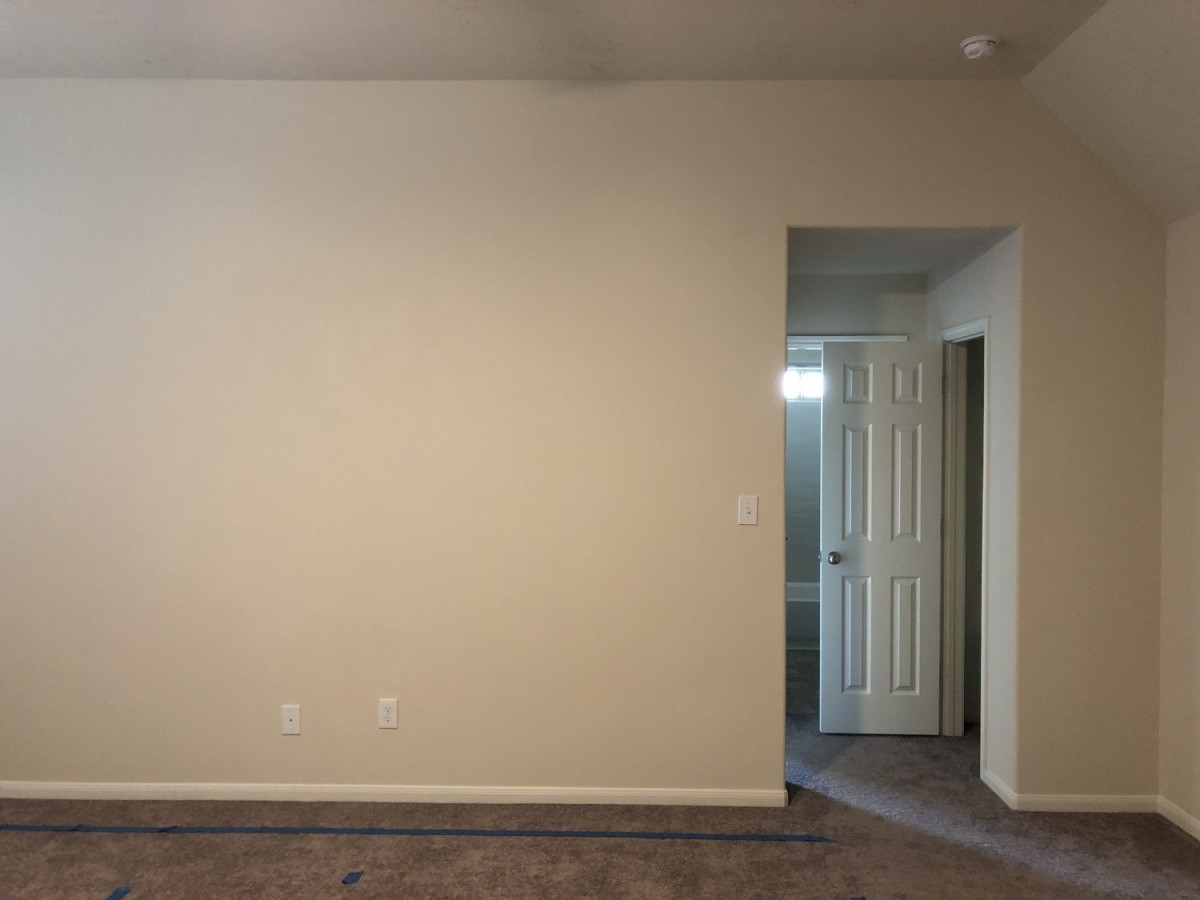
FlyboyAF replied to FlyboyAF's topic in Club Making/Repair & DIY Projects
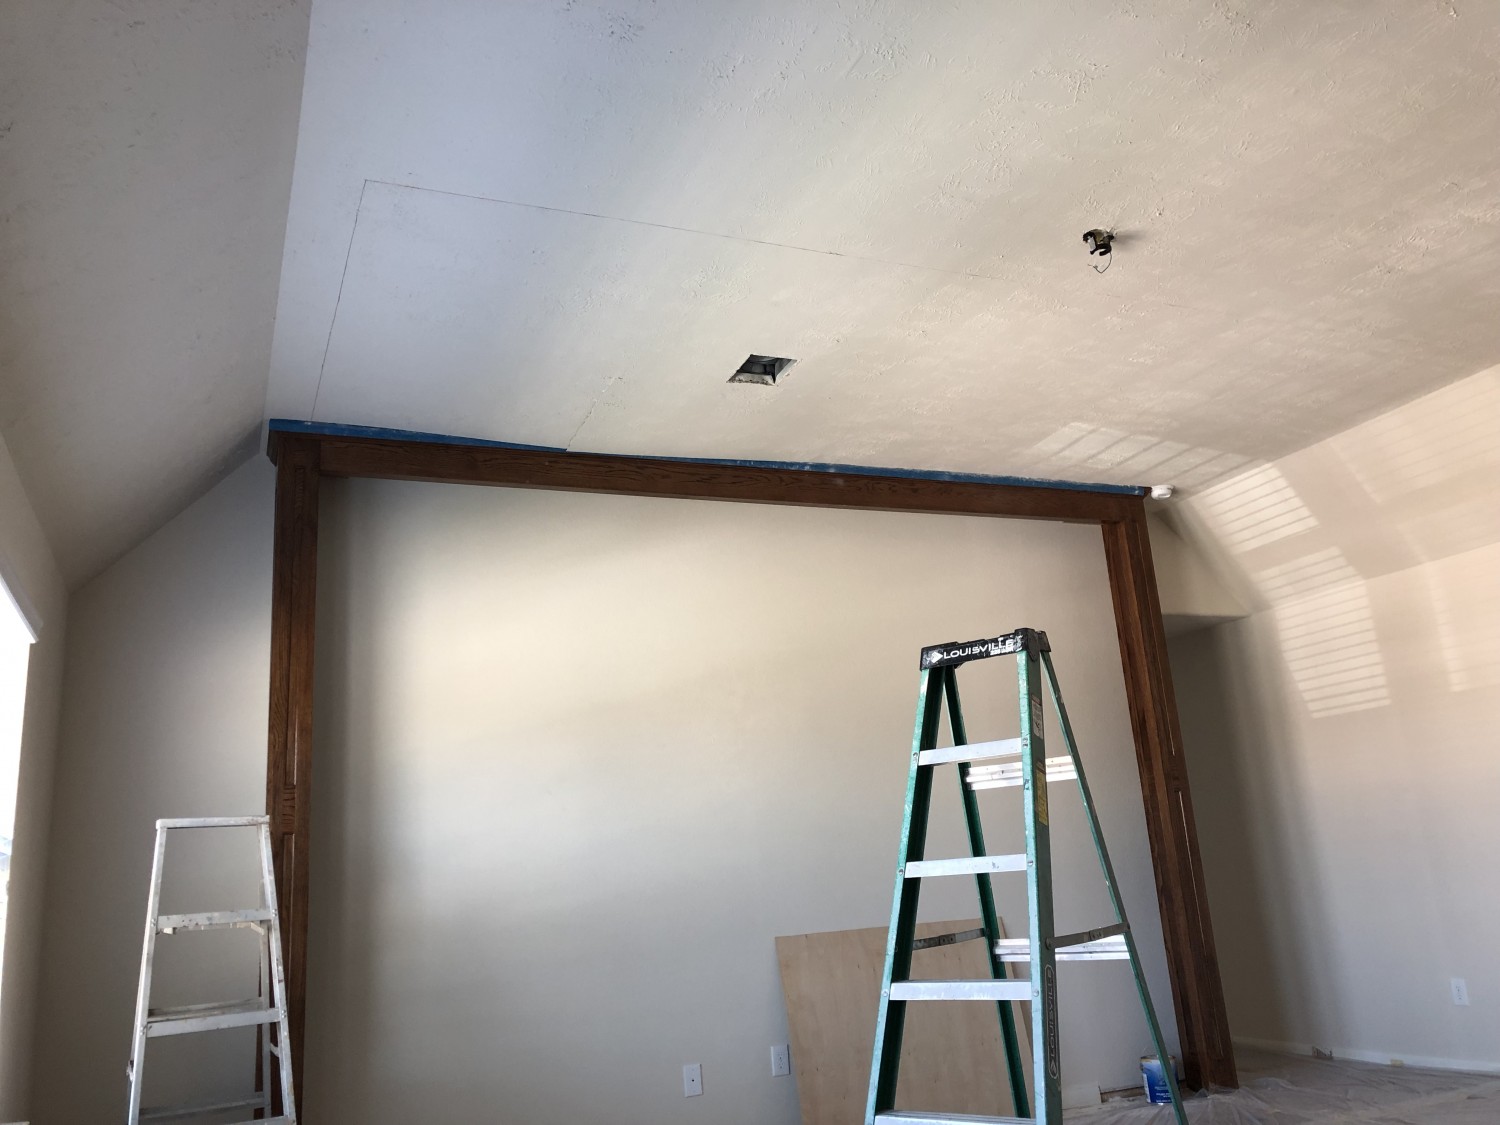
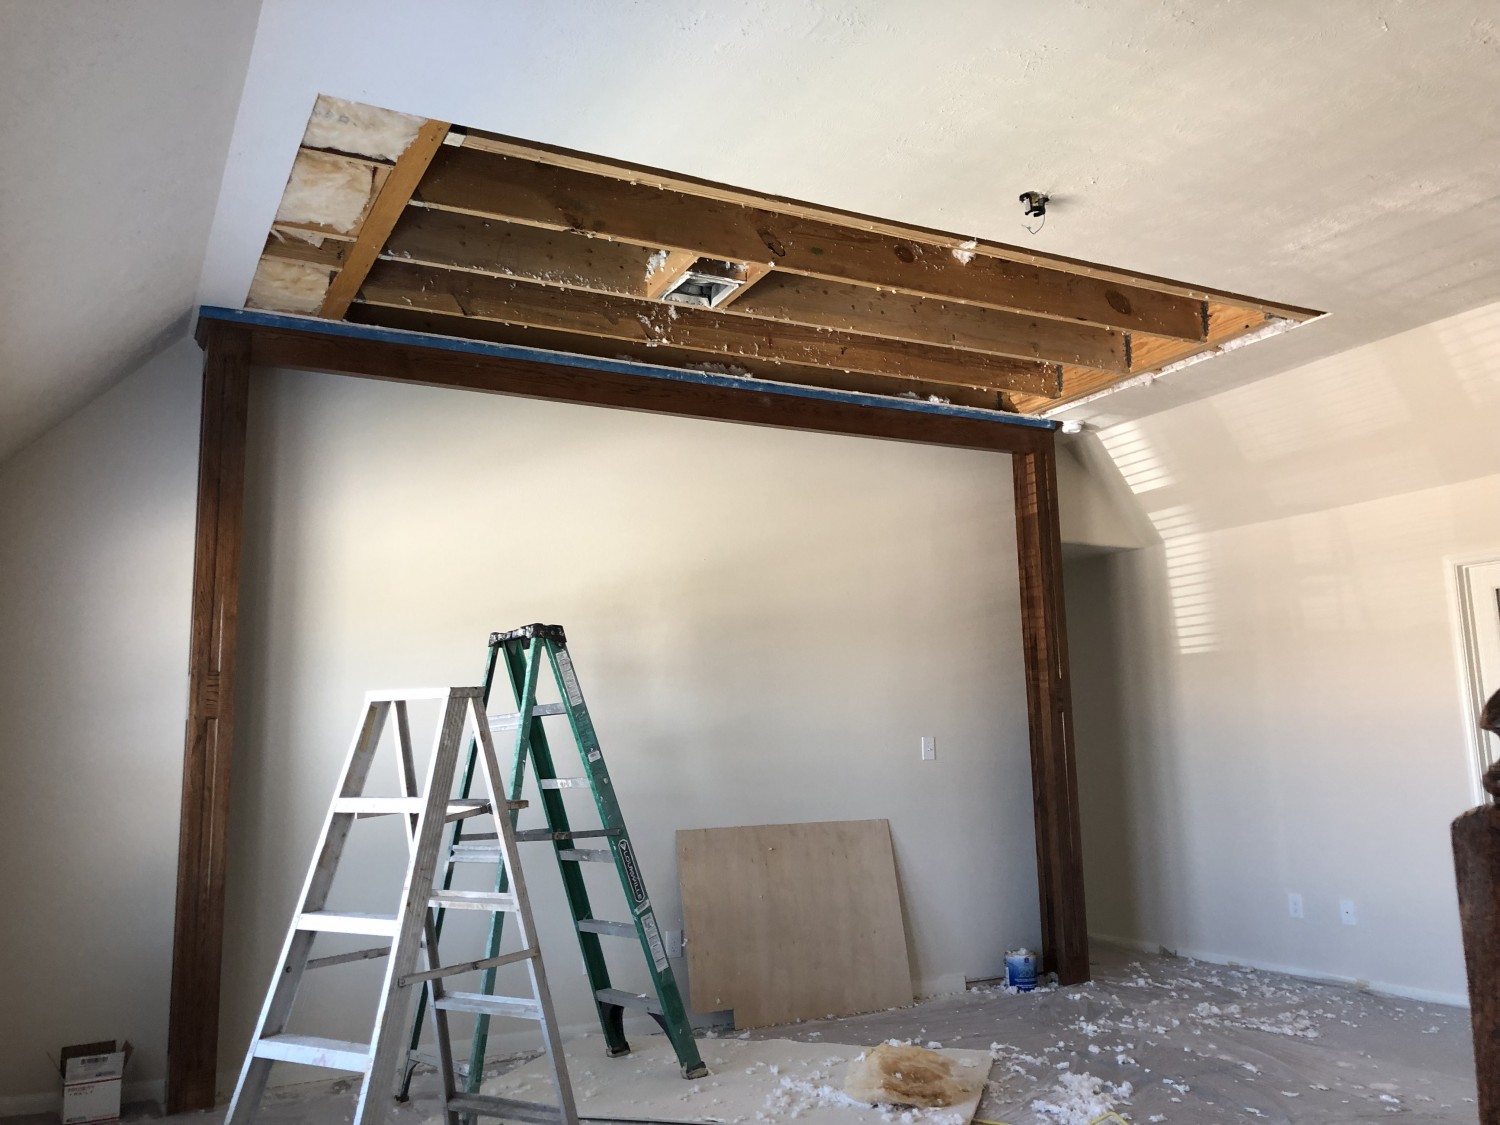
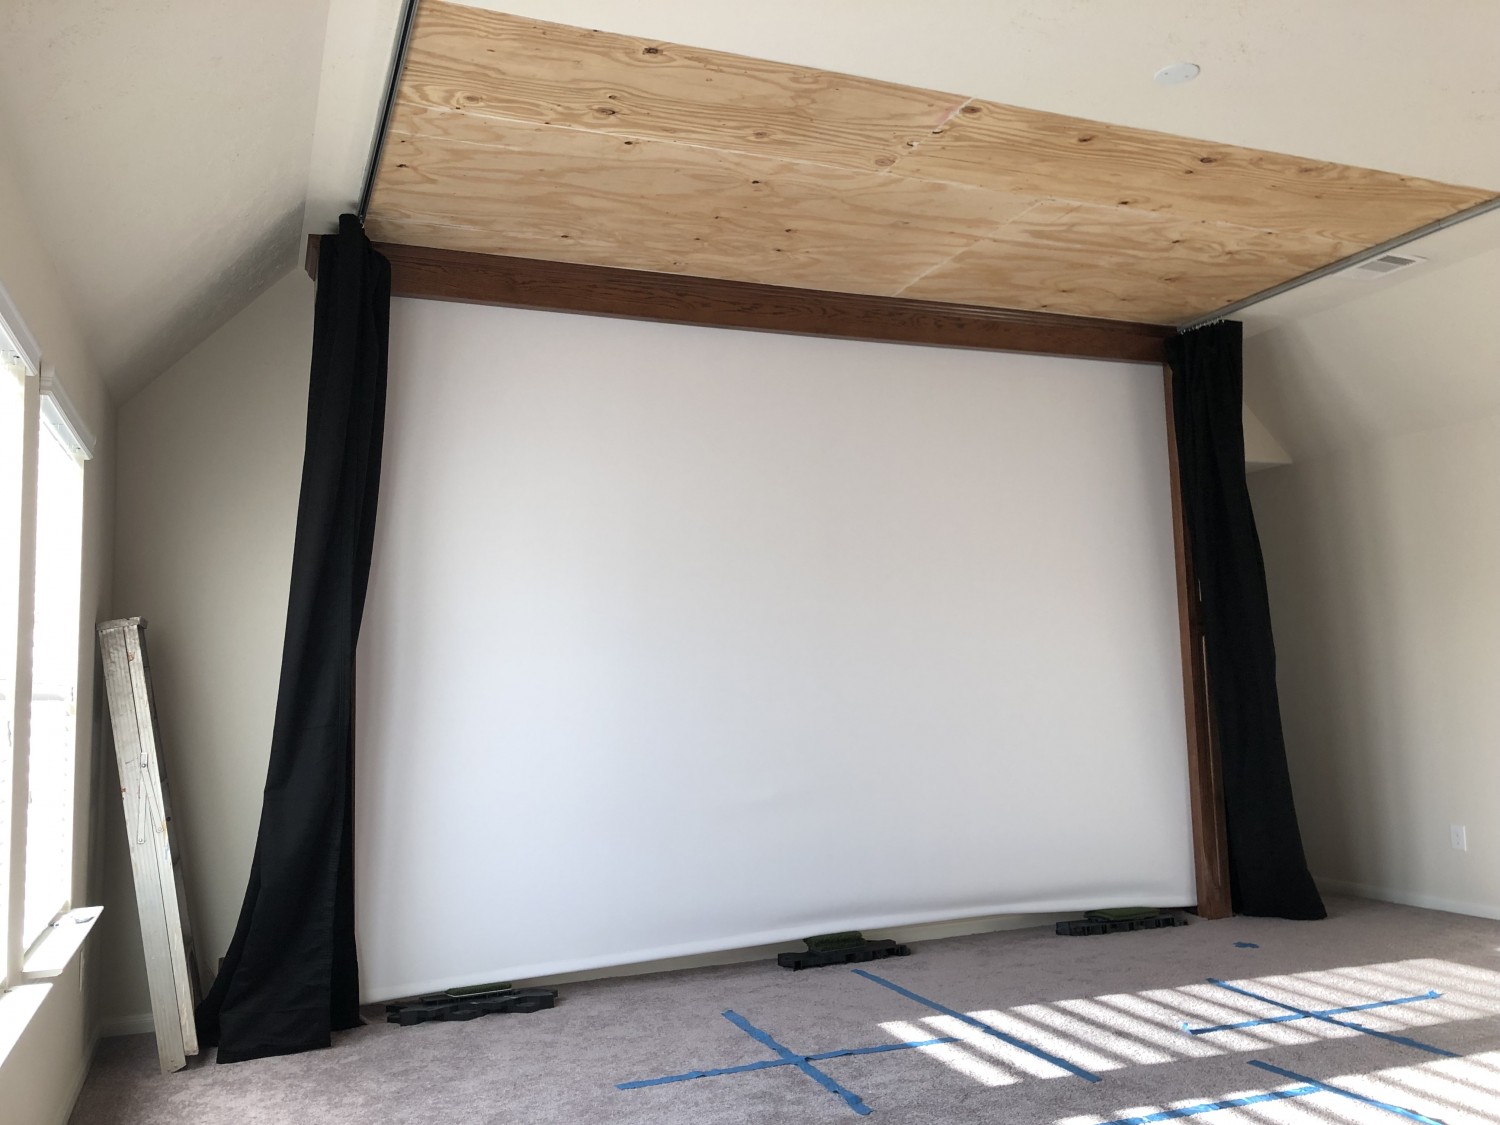
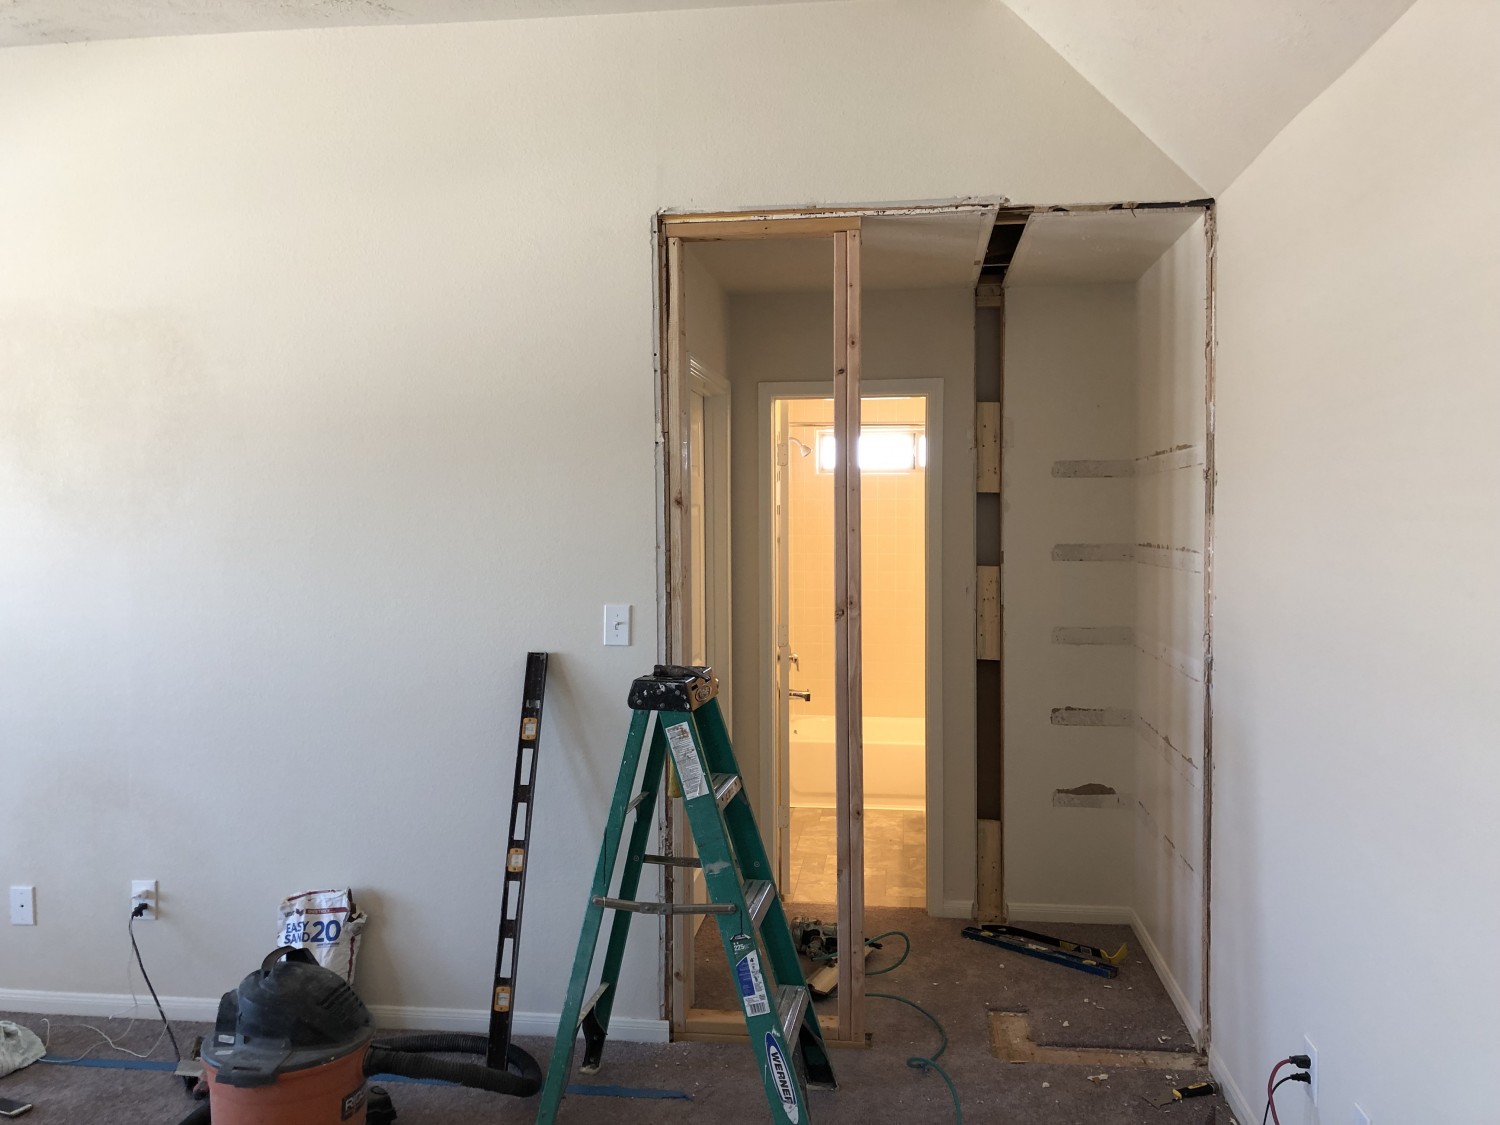
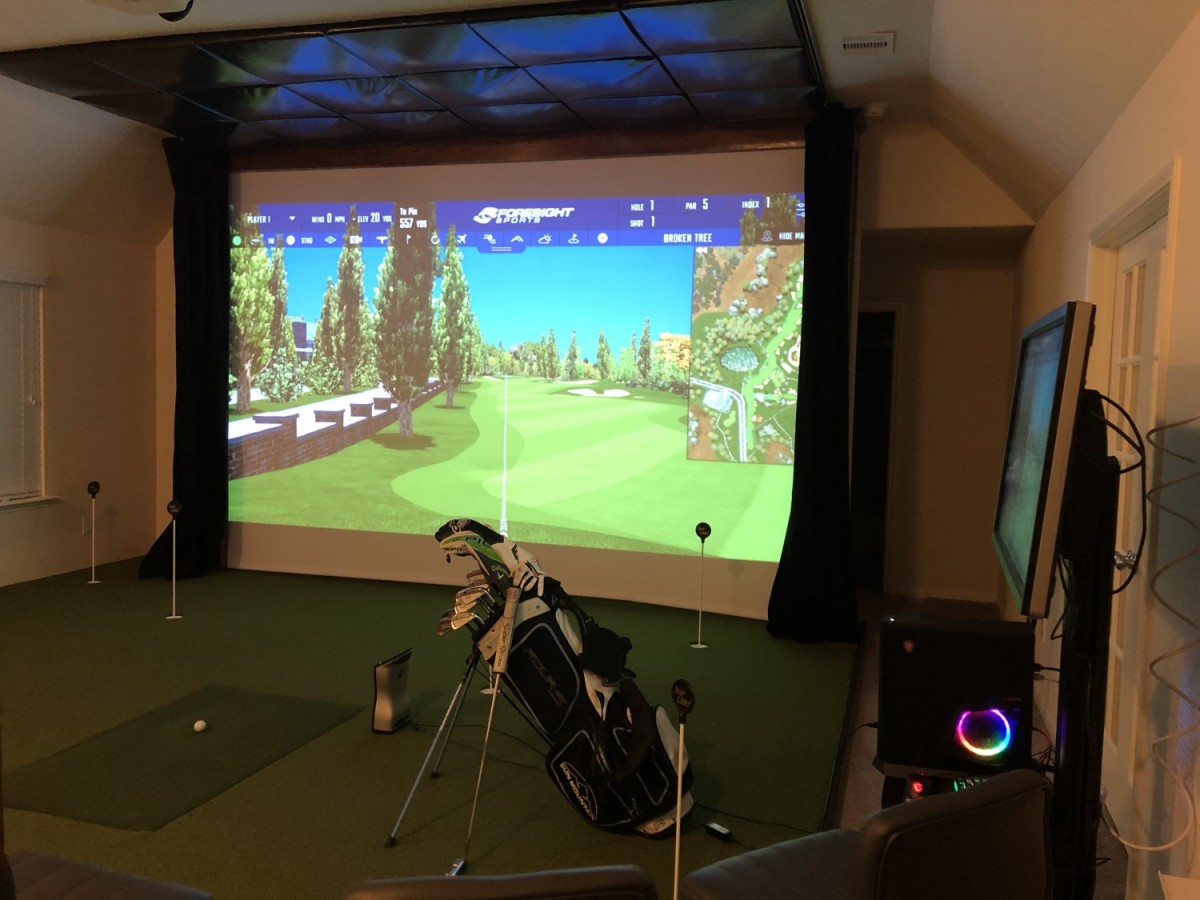
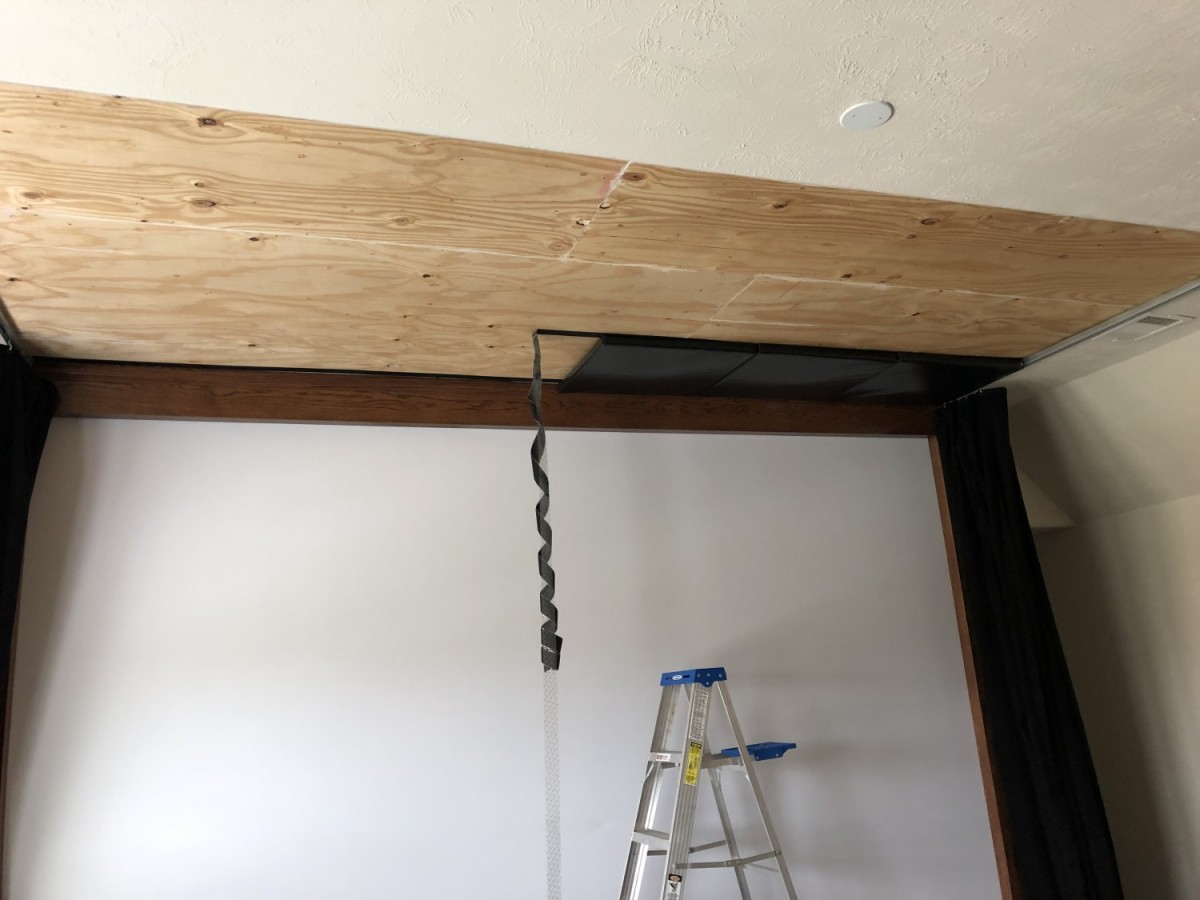
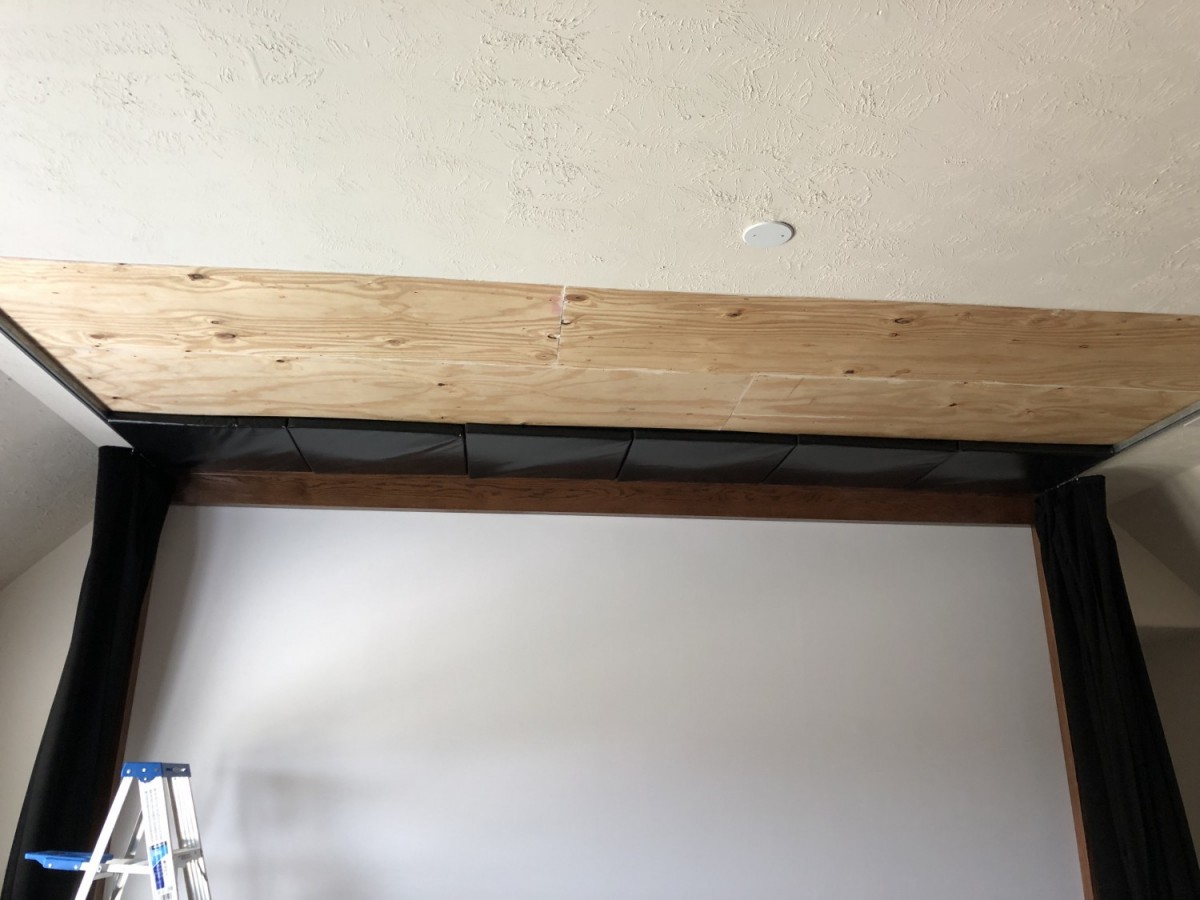
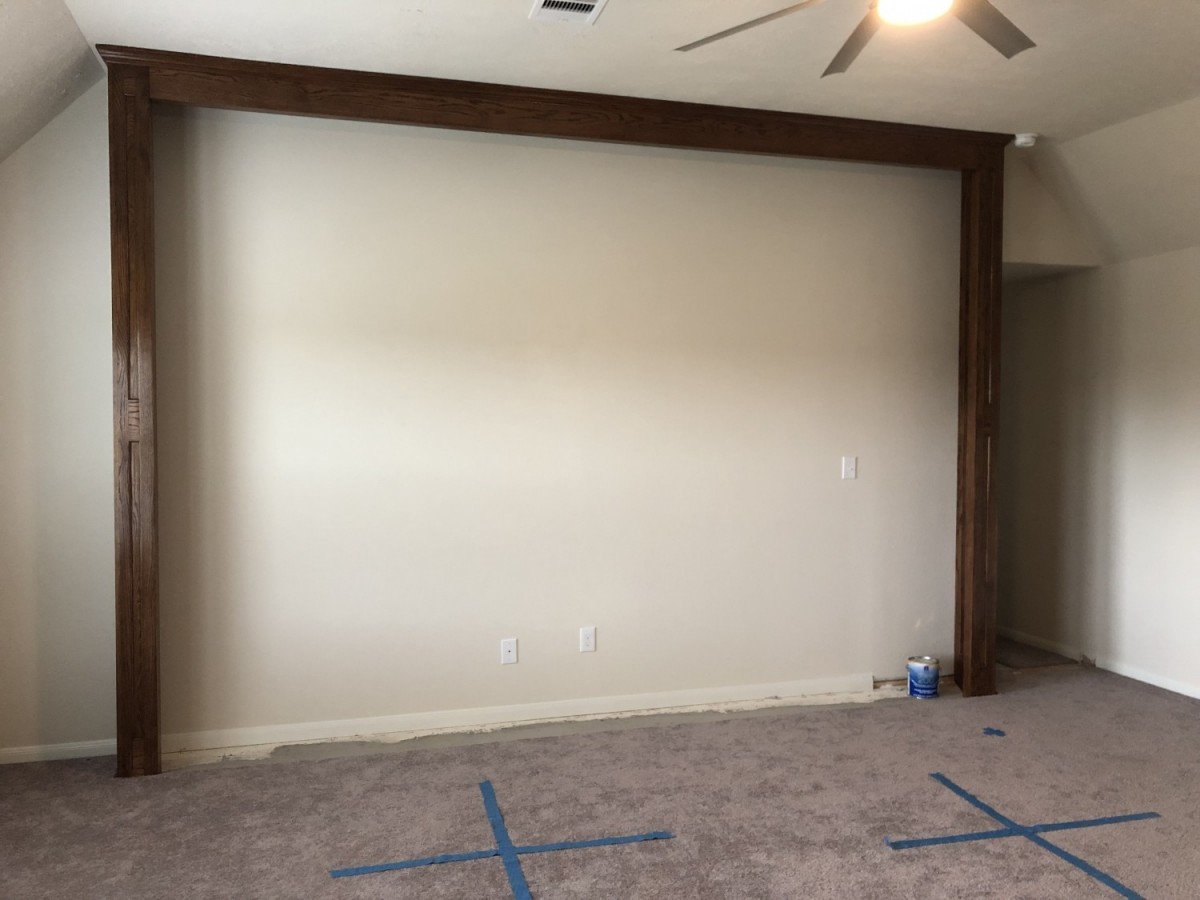
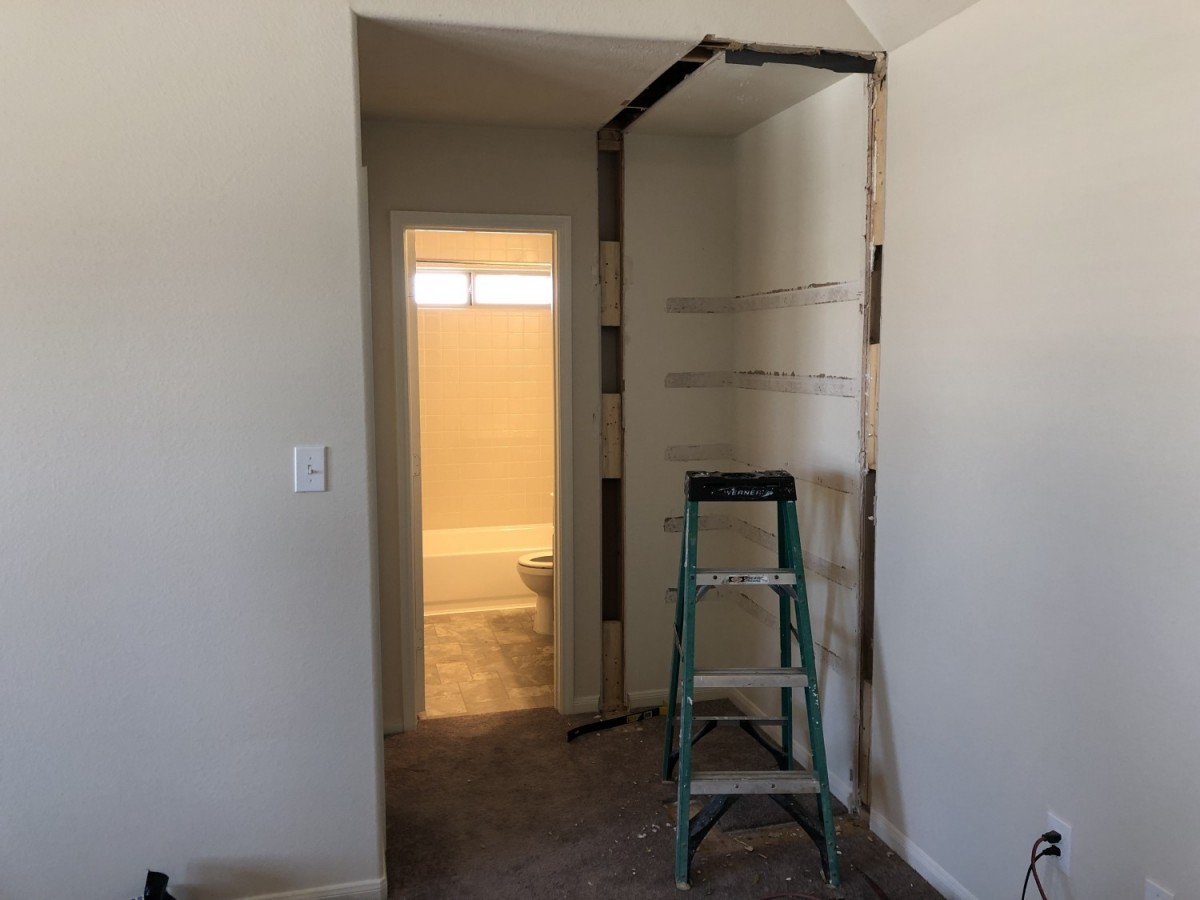
Stage 3: Frame / Impact Screen / More Demo & Construction Frame / Enclosure: Now that the space fits the plans, it was time to figure out what kind of structure to use to hang the impact screen into place. You have a lot of options here depending on your available space & budget. Enclosure packages can be purchased from Carl's Place, All Sport Systems, GSA, Custom Design Golf, Rain or Shine Golf, etc just to name a few. Most of them utilize metal tubing (assembly required) and nylon draping. I didn't see anything that screamed "Wow, now that looks awesome".....so I decided to put my own deal together. I utilized a woodworking contractor to build the frame (Houston area DM me for contact info). He came to the house, took his measurements, did some widdling, stained it, and installed the frame. To secure the impact screen, we installed screw hooks to the inside of the frame all of the way around (for use in attaching the bungee cording). $1,700 I purchased 2 sets of 10oz (10' x 10') heavy black drapes and track-rail system from GSA to provide side shank protection for first dates who want to "learn how to play" and other newbs I'll talk about the ceiling protection in the next stage to complete the "Enclosure". $1,199 GSA Drape Enclosures Impact Screen: The best I found out there in the world were the Premium Impact Screens from Carl's Place. You have options of Standard, Preferred, or Premium. All 3 are rated to withstand impact up to 250+ mph (if Jamie Sadlowski comes to your house to play a round with you....DON'T let him hit driver!). The usage is what will steer you down the path of which you need. The Premium has the smoothest surface (projected image quality), has 3 layers of heavy-duty, tight-knit polyster, and is built for heavy usage (I try to hit balls every day). The website helps to size the screen for you after you enter some dimensional information and their customer support is awesome if you have any questions. Ordered the bungees from these guys too. My Screen: Premium 115" x 167" (Finished Dimensions) for $935 with free shipping Carl's Place Premium Impact Screens Next project was to ready the ceiling for the ceiling protection from lob shots and crown-killing driver pop ups....sooooooo more demo! I removed the ceiling sheet rock 6' front-to-back (from the impact screen) and 14' side-to-side (between the rail tracks). First relocate the sprayed insulation in the attic above the cut-out area or else this could get really messy lol. I also had to remove a large ceiling fan and relocate an A/C vent. Next step was to install plywood to replace the sheet rock so that I could install the ceiling protection in Stage 4. $800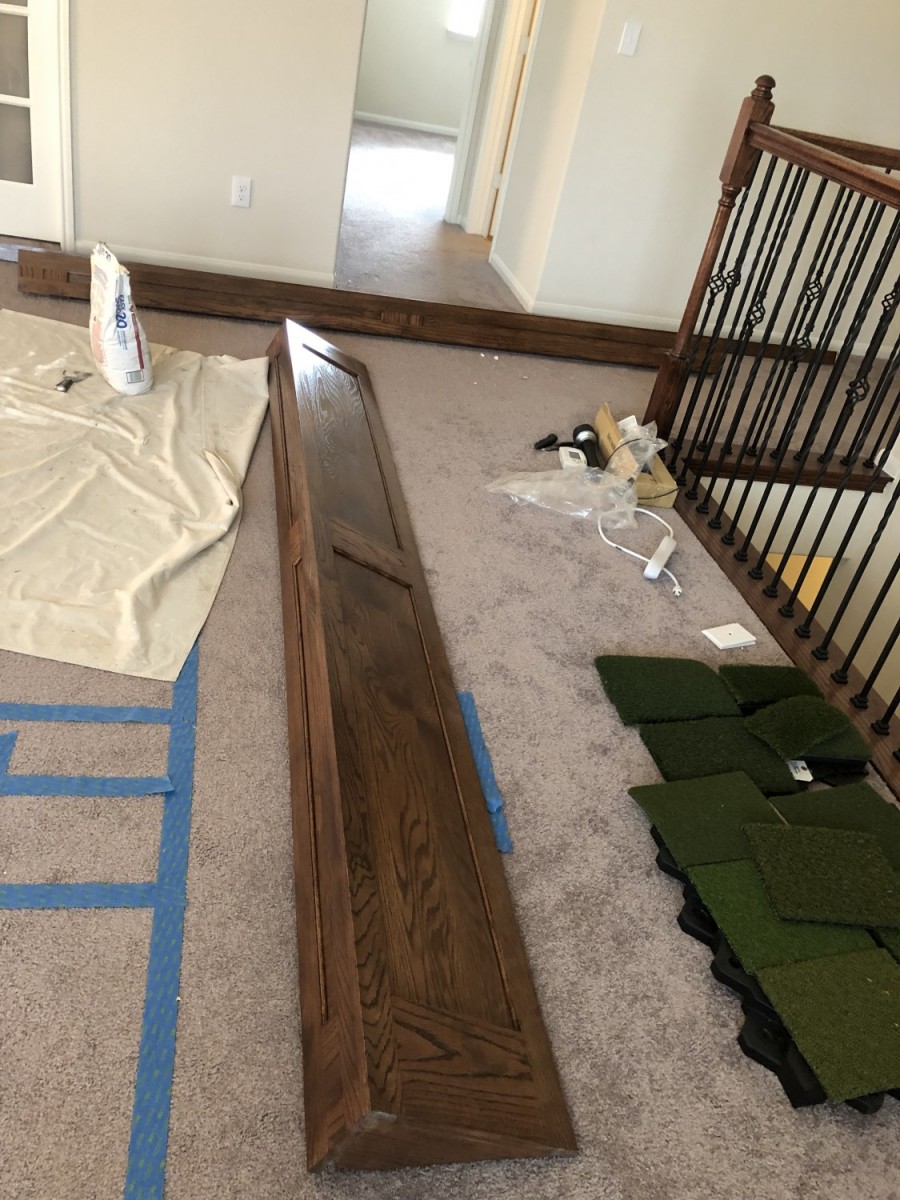


-
Building a Quality Golf Simulator
FlyboyAF replied to FlyboyAF's topic in Club Making/Repair & DIY Projects
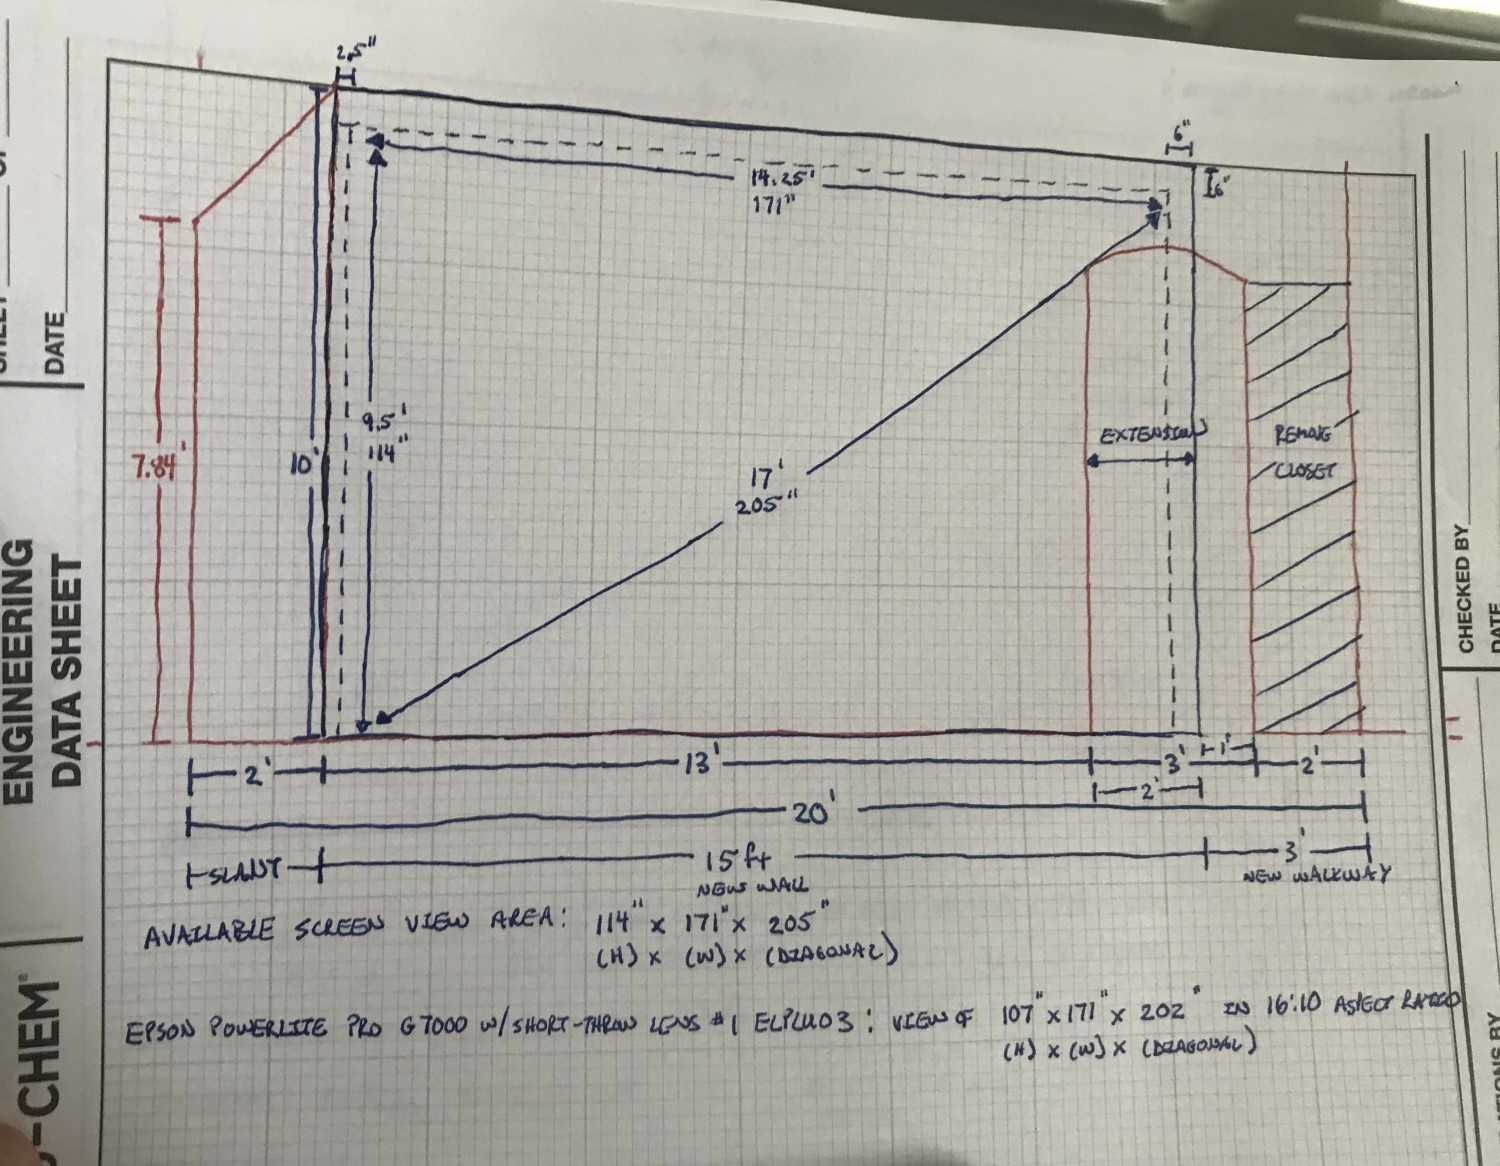
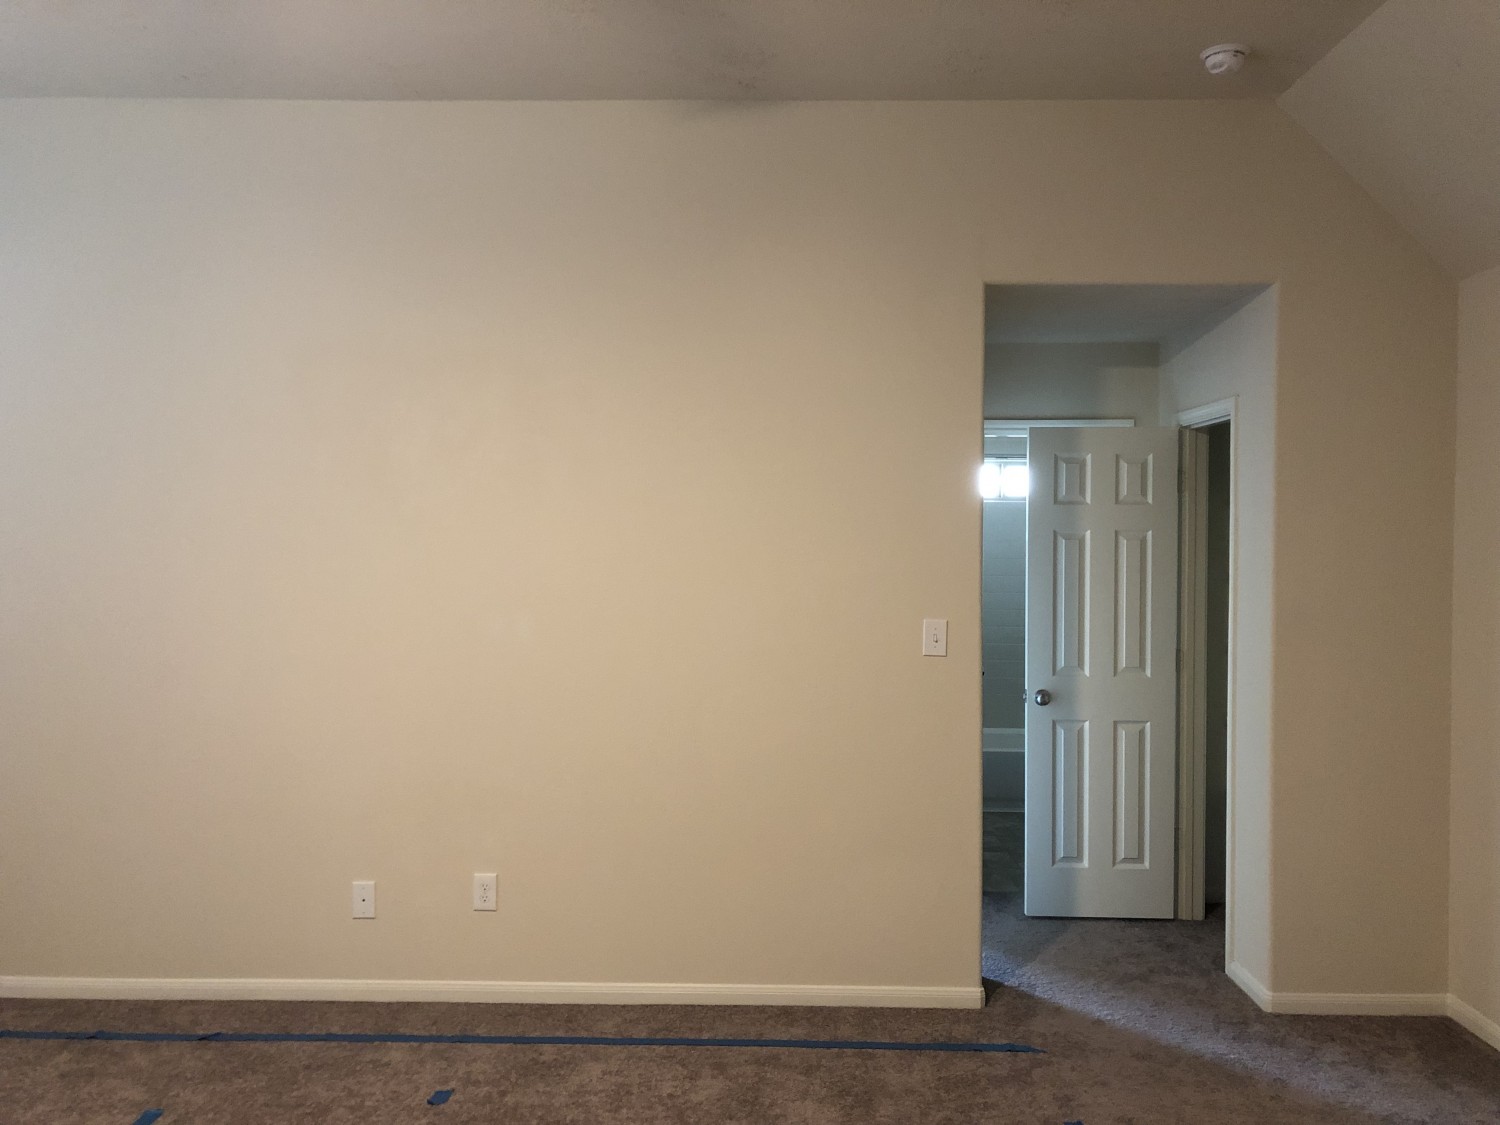
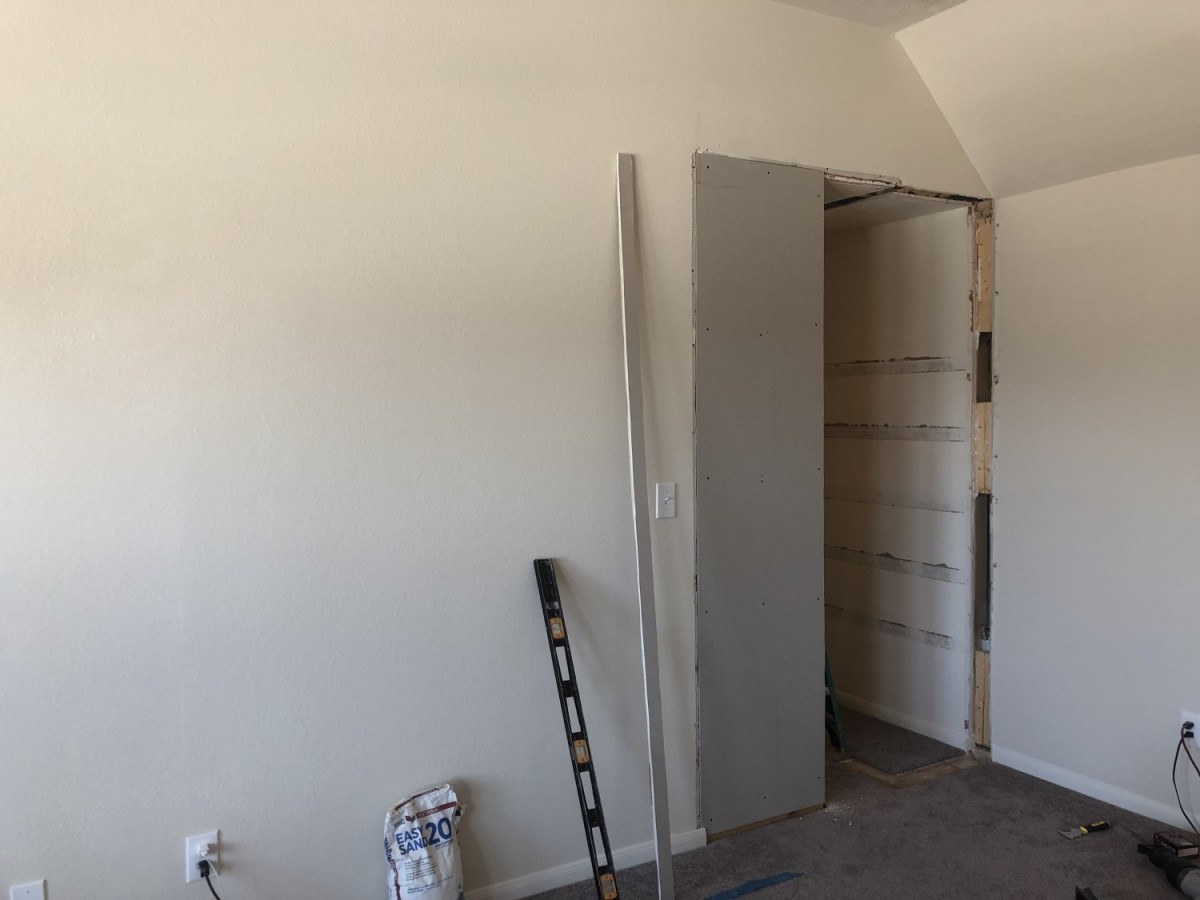
Stage 2: Modify the Space to Fit the Plans! Realistically, it should be modify the plans to fit the space.....but that wouldn't be any fun now would it?! Soooooooooo in order to get the golden 16:10 Aspect Ratio for the projected simulator image, it was time to do some demolition and construction to extend the hitting wall by a couple of feet! ***Disclaimer: Consult a professional contractor before conducting any kind of structural modifications to your house! If you do not and remove any load-bearing supports, your roof could collapse and casualties are probable*** I ended up demolishing the useless mini-closet next to a bathroom that shall never be used and extending the hitting wall by 2 ft. $2,500 Note: Building codes require you to have 3ft of width in home walkways.....hence I could only extend the wall by 2 ft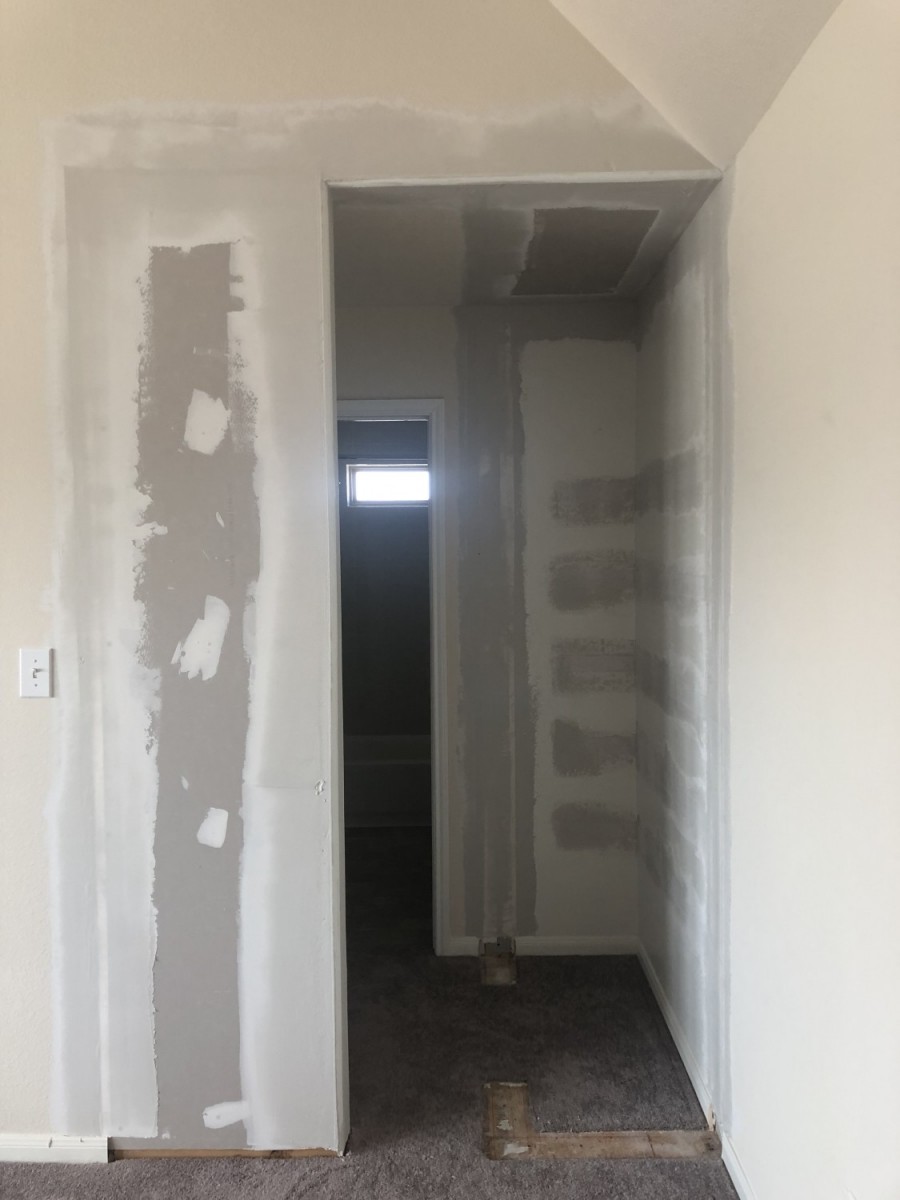

-
Building a Quality Golf Simulator
FlyboyAF replied to FlyboyAF's topic in Club Making/Repair & DIY Projects
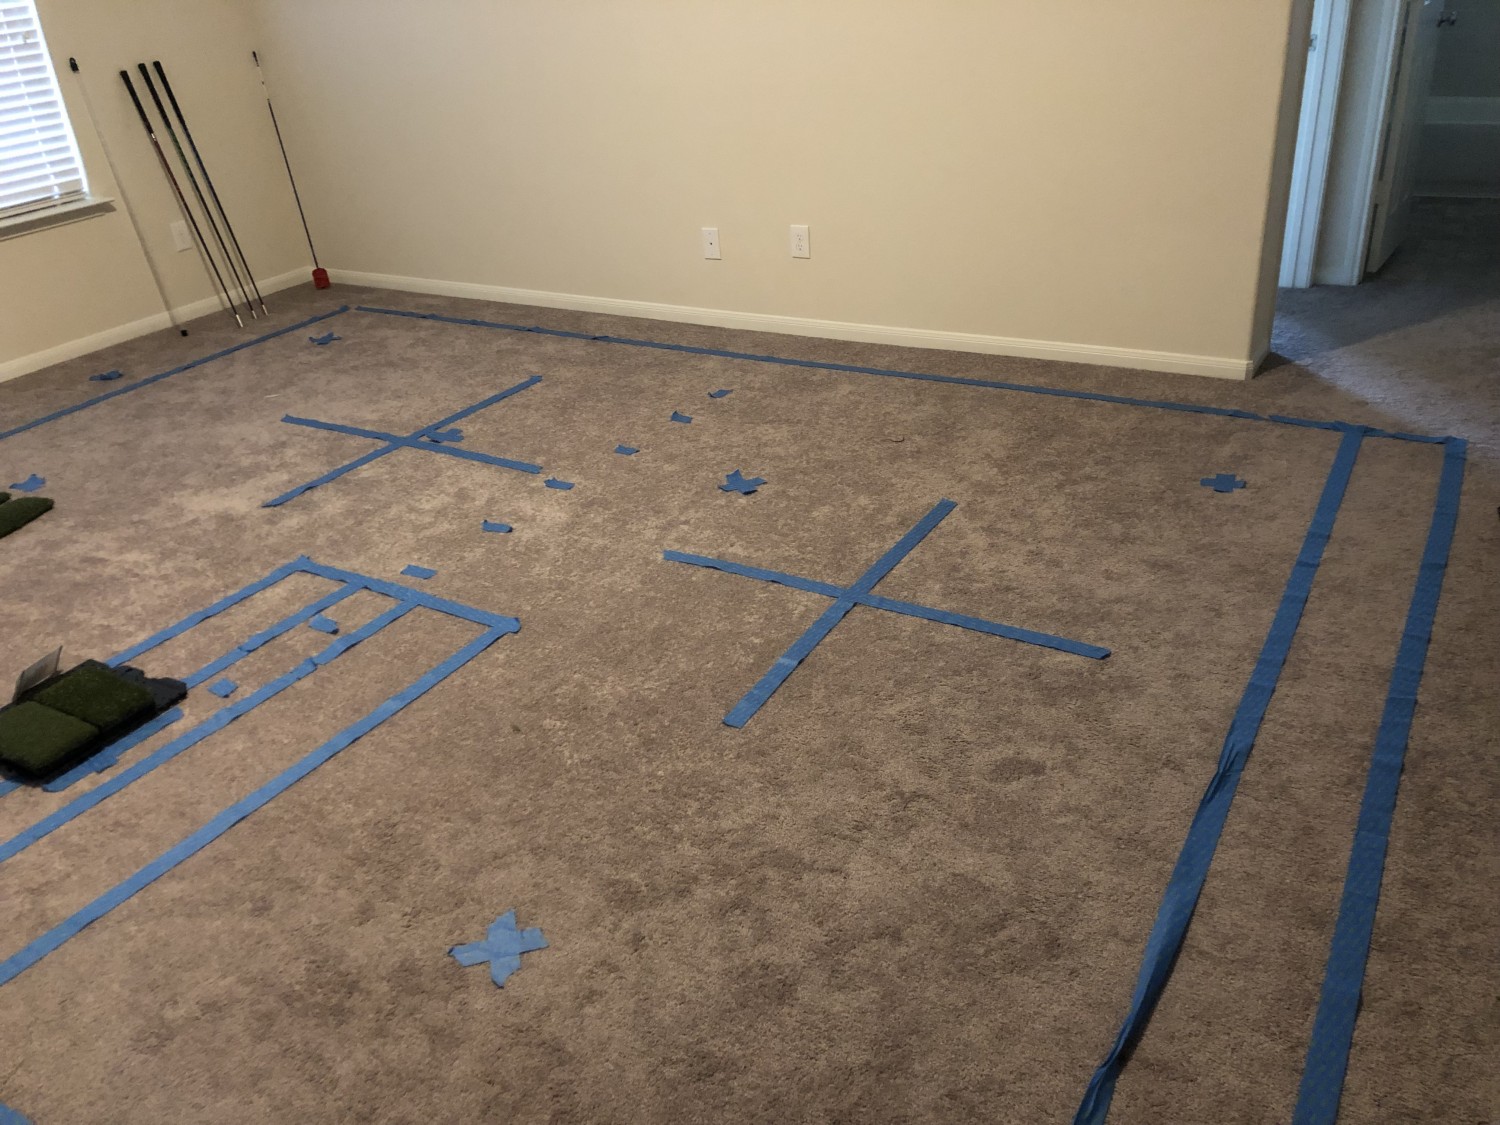
Stage 1: Identify Required Space & Draw Up the Plans Ceiling Height: If you can swing your driver without worry, that'll do....but not recommended. Minimum height of 8', but 10' or more is optimal (especially if you have tall friends!). Room Length (front-to-back): The type of launch monitor you will be using has a drastic impact on how much room you'll need front-to-back. Radar-Based Systems (i.e. Trackman) need up to 25' while Camera-Based Systems (i.e. GC Quad) don't require any extra room front-to-back as the unit is placed to the side and just in front of the hitting area. You should allow for ~14" -20" of space between the front wall and the impact screen so that the ball doesn't impact your drywall when the screen flexes at higher ball speeds. Your center hitting area should be located 7' - 10' from the impact screen (depending on how much tension you have in your impact screen - beware of bounce back!). From there, you'll need another 6' - 8' of clearance behind you to make comfortable swings. Room Width (side-to-side): The biggest factor here is how your displayed image from the simulator software will project onto the impact screen. The best view IMO is a 16:9 or 16:10 aspect ratio for widescreen effect. So if you have 10' of ceiling space, 17' of side-to-side room should accommodate 16' of viewable screen space after you account for the frame (~6" on either side). Once you figure out the above, draw up the dimensional plans of how you want to lay this bad boy out! : ) Once you have your drawings, you can use a long tape measure, a friend, and painting tape to transfer your drawing to the actual space to make sure it works....


-
Good morning MGS brethren! I am creating this thread to put quality information out into the community for those who are trying to research how to build an epic golf simulator. I just finished my build and it has drastically improved my game in the short time that it has been in use. When I started to research all of the different options for components however, not a lot of good information was available..... Now it will be! I will be updating this thread in a stage-type fashion. Each stage of the project will show pictures of the setup, components, and result. Each stage will also have all of the different vendors researched, the decision that was made & why, and links to the selected products. I hope that this will drastically help anyone going down the road of building their own. Enjoy!